
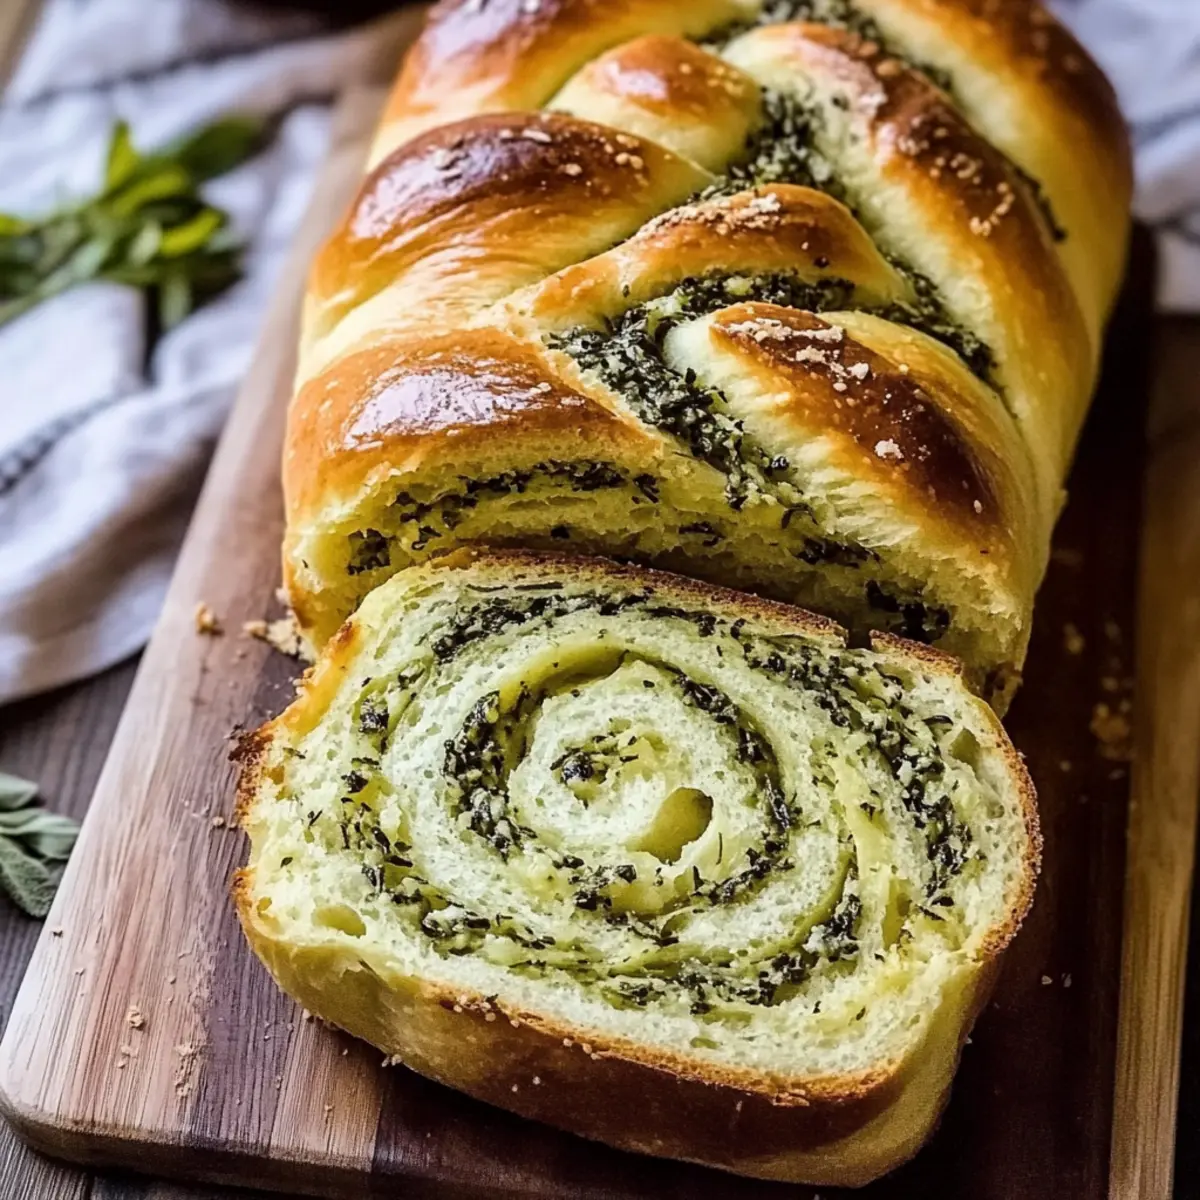
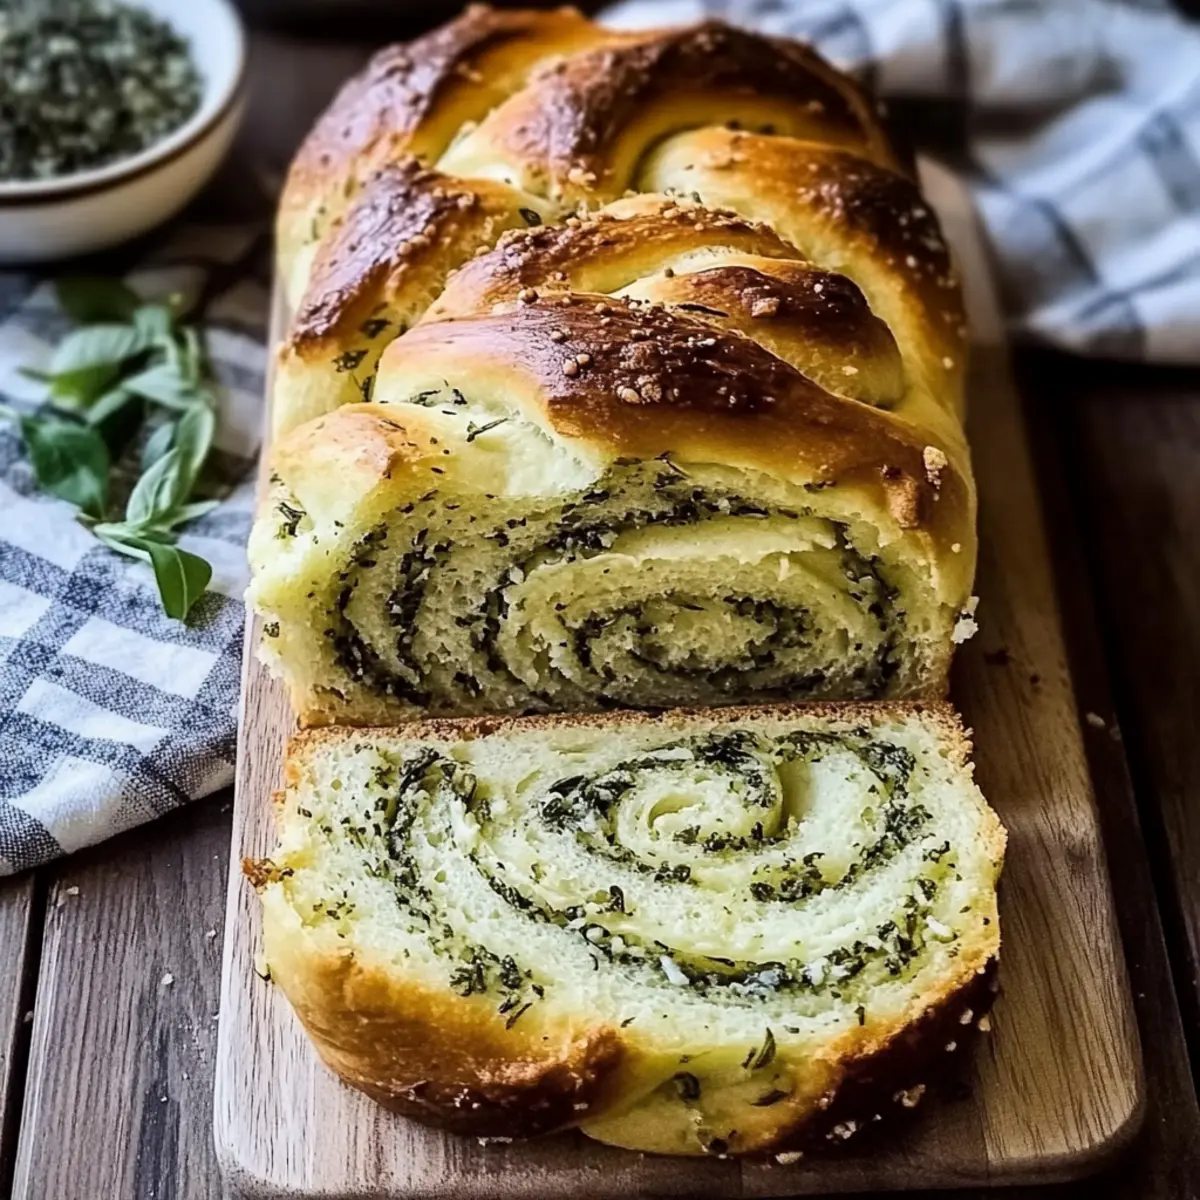
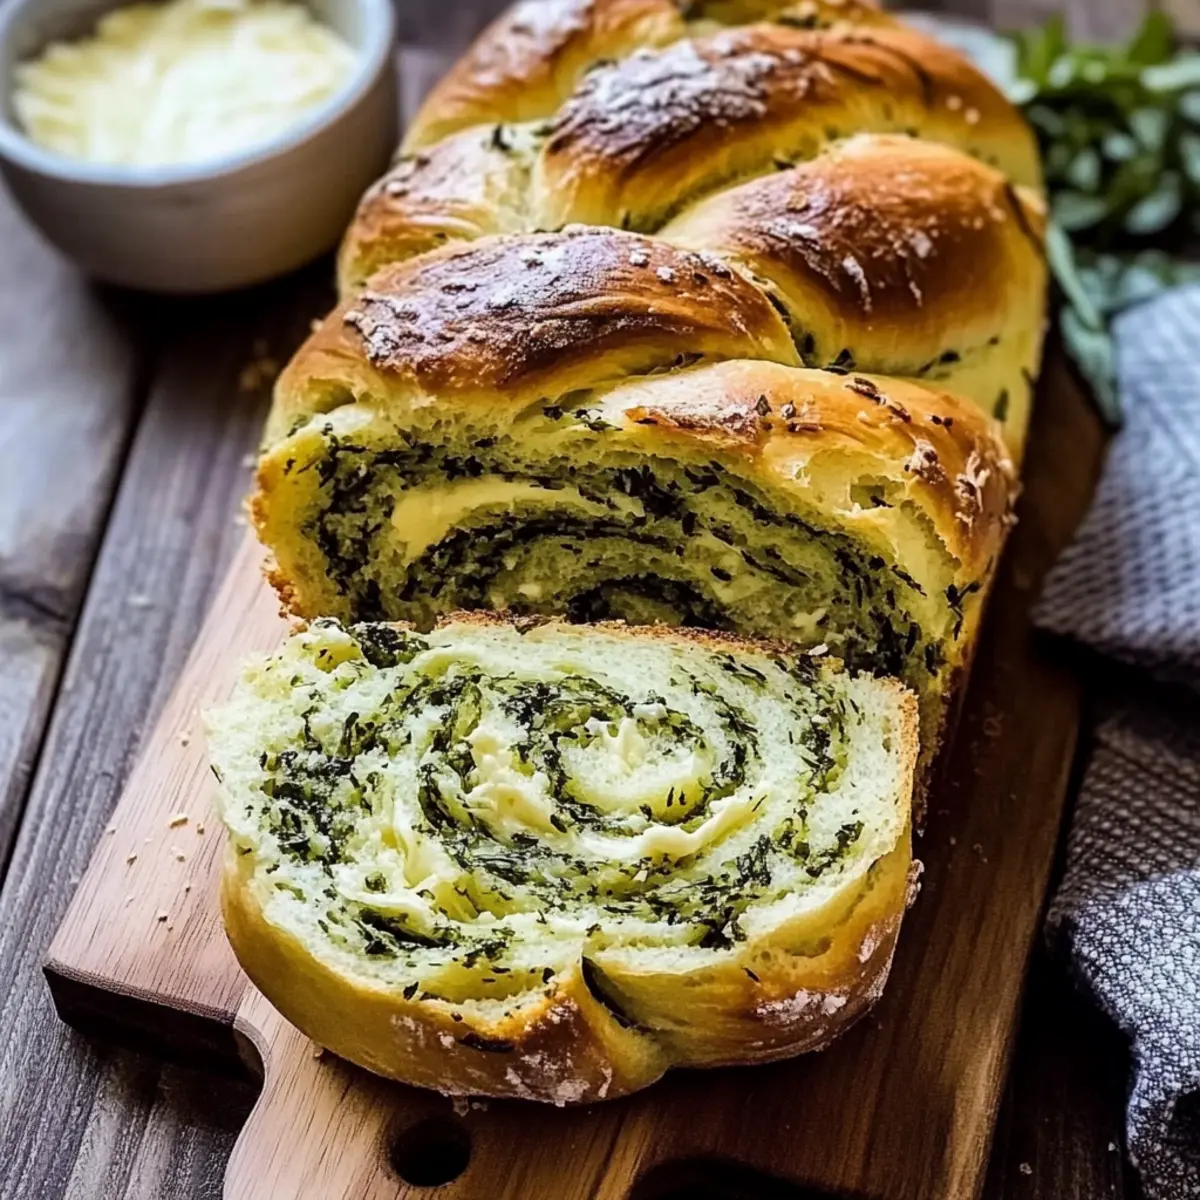
As I knead the dough, I can already tell this Swirled Garlic Herb Bread is going to be a game changer in my kitchen. The inviting scent of garlic mingling with fresh herbs and rich parmesan fills the air, promising a delightful experience ahead. What makes this homemade bread so special is its incredibly soft and buttery texture that’s perfect for any meal—whether slathered with butter or served alongside your favorite soup. Plus, it features an impressive twisted design that’s surprisingly simple to achieve, making it an ideal recipe for beginner bakers ready to dive into the world of bread-making. Are you curious to see how easy it is to create this stunning loaf? Let’s get started!
Why Is This Bread So Irresistible?
**Unmatched *freshness:* There’s nothing like the smell of homemade bread wafting through your kitchen—it’s a comforting embrace!
Beginner-friendly: The step-by-step process makes baking this Swirled Garlic Herb Bread a breeze, perfect for those new to bread-making.
Versatile sidekick: Pair it with hearty soups like broccoli cheddar or enjoy as a toasted snack with butter for an elevated experience.
Visual delight: The twisted shape creates a stunning presentation that will impress family and friends, making every meal feel special.
Customizable goodness: Feel free to experiment with herbs or cheese to tailor it to your tastes; the possibilities are endless!
Time-saving: With a make-ahead option, you can easily prepare this bread without stress. Get ready to fall in love with this delicious, show-stopping loaf!
Swirled Garlic Herb Bread Ingredients
For the Dough
- Milk – Provides moisture and soft texture; for a lactose-free version, use dairy-free milk.
- Instant Yeast – Helps the bread rise for a light, airy crumb; no substitution needed.
- Honey – Adds sweetness and activates the yeast; substitute maple syrup or agave for a vegan option.
- Eggs – Contributes rich flavor and structure; for a vegan option, try flax eggs (1 tbsp ground flaxseed + 2.5 tbsp water).
- All-Purpose Flour – Forms the base, creating wonderful fluffiness; bread flour can also offer a chewier texture.
- Salted Butter – Enhances flavor and ensures a tender crumb; use olive oil for a dairy-free alternative.
For the Garlic Herb Filling
- Garlic – Provides aromatic savory taste; roasted garlic can add a sweeter profile if preferred.
- Parmesan Cheese – Adds umami depth; can be replaced with cheddar or pecorino for a twist.
- Fresh Basil, Thyme, and Sage – Infuse earthy, delightful flavors; substitute dried herbs using 1/3 of the fresh amount, or try oregano or rosemary.
Get ready to bake this delightful Swirled Garlic Herb Bread that’s both a feast for the eyes and the taste buds!
Step‑by‑Step Instructions for Swirled Garlic Herb Bread
Step 1: Prepare the Dough
In a large mixing bowl, combine 1 cup of warm milk, 2 teaspoons of instant yeast, and 2 tablespoons of honey. Let this mixture sit for about 5-10 minutes until it becomes frothy. Next, add 2 eggs, 4 cups of all-purpose flour, and 1 teaspoon of salt. Use a dough hook and mix for 4-5 minutes until the dough starts to come together. Then, knead in 3 tablespoons of softened salted butter for another 2-3 minutes until the dough is smooth and elastic.
Step 2: Let the Dough Rise
Transfer the dough into a lightly oiled bowl and cover it with a clean kitchen towel or plastic wrap. Place the bowl in a warm, draft-free area and allow it to rise for about 1 hour, or until it has doubled in size. You’ll know the dough is ready when it looks puffy and has increased significantly in volume.
Step 3: Prepare the Garlic Herb Butter
While the dough is rising, prepare the garlic herb filling. In a medium mixing bowl, combine 1/2 cup of softened butter, 4 cloves of minced garlic, 1/2 cup of grated parmesan cheese, and 1 tablespoon each of chopped fresh basil, thyme, and sage. Use a fork or spatula to mix the ingredients thoroughly until the mixture is well combined and spreadable.
Step 4: Roll and Fill the Dough
After the dough has risen, turn it out onto a floured surface. Roll it into a 12×18 inch rectangle, ensuring even thickness. Spread the garlic herb butter mixture evenly over the dough, leaving a small border around the edges for easier rolling. Visualize the swirls you’ll create as you spread the filling—it will make the Swirled Garlic Herb Bread truly delightful!
Step 5: Shape the Bread
Starting from one long edge, carefully roll the dough tightly into a log. Once rolled, use a sharp knife to cut the log lengthwise down the center, exposing the swirled filling within. Twist the two halves together and shape them into an S or spiral design, ensuring the filling is beautifully displayed on the outside.
Step 6: Second Rise
Place the twisted bread onto a parchment-lined baking sheet. Cover it lightly with a towel and let it rise again for about 45 minutes. This second rise allows the flavors inside the Swirled Garlic Herb Bread to enhance and develop further, creating an even more delightful loaf.
Step 7: Bake the Bread
Preheat your oven to 350°F (175°C). Once preheated, bake the Swirled Garlic Herb Bread in the oven for 30-35 minutes, or until it turns golden brown and sounds hollow when tapped on the bottom. Keep an eye on the color; if it browns too quickly, feel free to cover it with aluminum foil during the last 10 minutes of baking.
What to Serve with Swirled Garlic Herb Bread
Imagine sinking your teeth into a warm piece of buttery bread, perfectly complementing the rich aromas of your favorite dishes. Here are some delightful pairings that will elevate any meal.
-
Creamy Tomato Soup: This classic combination is comfort food at its best, with the acidity of the soup balancing the rich garlic notes of the bread.
-
Fresh Salad: A light, crunchy salad filled with greens and a tangy vinaigrette adds a refreshing contrast, making each bite feel vibrant and satisfying.
-
Hearty Broccoli Cheddar Soup: Pairing with this creamy soup creates a delightful duo that brings warmth and satisfaction, making every meal memorable.
-
Garlic Butter Shrimp: The succulent shrimp complements the garlic flavors in the bread, enhancing the overall experience without overshadowing the bread’s delicate texture.
-
Cheese Platter: Set out a variety of cheeses for a delightful grazing experience. The savory elements of aged cheddar or brie mingling with your garlic herb bread creates a heavenly bite.
-
Balsamic Olive Oil Dip: Brighten your palette by serving the bread with a homemade balsamic and olive oil dip for an Italian-inspired tasting that dazzles the senses.
-
Roasted Vegetables: Charred veggies bring caramelized sweetness that offsets the bread’s buttery essence, creating an earthy yet elegant side to your meal.
-
Simple Butter & Sea Salt: Sometimes, simplicity is key. A spread of rich butter topped with a sprinkle of sea salt allows the bread to shine, enhancing its natural flavors.
Expert Tips for Swirled Garlic Herb Bread
-
Dough Consistency: Ensure the dough is slightly tacky but not overly sticky; add more flour gradually if needed for the perfect texture.
-
Yeast Activation: Always use warm milk—too hot can kill the yeast. Make sure your yeast is fresh for optimal rise.
-
Even Baking: To avoid overbaking, cover the bread with foil if it starts to brown too quickly during the last 10 minutes.
-
Twisting Technique: When shaping the loaf, be gentle to retain air bubbles; this ensures a light and fluffy Swirled Garlic Herb Bread.
-
Flavor Variations: Mix and match herbs to create your own unique flavor profiles; don’t hesitate to be creative with your fillings!
-
Storage Reminder: For the best freshness, store your bread in an airtight container for up to 3 days, or freeze for longer preservation.
Make Ahead Options
These Swirled Garlic Herb Bread loaves are not only delicious but also perfect for meal prep! You can prepare the dough up to 24 hours in advance by following the initial steps and then refrigerating it (make sure it’s covered tightly to prevent drying out). Additionally, the garlic herb butter filling can be made and stored in the fridge for up to 3 days. When you’re ready to bake, allow the dough to come to room temperature for about 30 minutes before rolling it out and proceeding with shaping and the second rise. With this make-ahead strategy, you’ll have fresh-baked bread that tastes just as incredible, saving you time on busy weeknights!
Swirled Garlic Herb Bread Variations
Feel free to explore these delightful twists on your Swirled Garlic Herb Bread to suit your taste buds!
-
Herb Swap: Switch basil for oregano or rosemary for a different flavor profile. Experimenting with herbs can transform your bread experience into something exciting and new!
-
Olive Oil Butter: Use olive oil instead of butter for a lighter, dairy-free alternative. This variation not only caters to dietary preferences but also adds a deliciously subtle flavor.
-
Cheese Variety: Substitute parmesan with cheddar or pecorino to create a unique taste. Each cheese brings its own character, making every loaf a potential adventure!
-
Add Some Heat: Mix in red pepper flakes to the garlic herb butter for a spicy kick. The warmth from the pepper enhances the overall flavor, taking your bread to an exciting new level.
-
Veggie Infusion: Incorporate finely chopped spinach or sun-dried tomatoes into the garlic herb butter. Adding veggies not only boosts nutrition but also adds a colorful twist to every slice.
-
Sweet Twist: For a sweeter version, fold in some chopped dried fruit like cranberries or apricots into the dough. This creates a sweet-savory balance, perfect for breakfast or brunch!
-
Nutty Crunch: Add a sprinkle of toasted nuts, like pine nuts or walnuts, in the filling. This variation not only adds texture but also a delightful nutty flavor to each bite.
-
Roasted Garlic: Use roasted garlic instead of raw for a sweeter, caramelized flavor. This cozy twist enhances the comforting nature of the bread and lends a subtle, mellow taste.
Get inspired to make your Swirled Garlic Herb Bread truly your own, and don’t forget to pair it with a cozy bowl of soup or a delightful spread!
Storage Tips for Swirled Garlic Herb Bread
-
Room Temperature: Store your Swirled Garlic Herb Bread in an airtight container at room temperature for up to 3 days to maintain its freshness and softness.
-
Fridge: If you’re not planning to eat the bread within 3 days, you can refrigerate it for up to a week. Wrap it tightly to prevent drying out, but be aware the texture may change slightly.
-
Freezer: For longer storage, wrap the bread tightly in plastic wrap and then place it in a freezer bag or airtight container. It can be frozen for up to 3 months.
-
Reheating: To enjoy leftovers, reheat your Swirled Garlic Herb Bread in the oven at 350°F (175°C) for about 10-15 minutes until warmed through, restoring its delightful texture.

Swirled Garlic Herb Bread Recipe FAQs
How do I select the best ingredients for this recipe?
Absolutely! When selecting your ingredients, look for fresh garlic without dark spots and herbs that are vibrant and fragrant. For milk, choose whole or 2% for creaminess, or opt for dairy-free alternatives if needed. Always check the expiration date on instant yeast to ensure it’s active.
What’s the best way to store Swirled Garlic Herb Bread?
Store your bread in an airtight container at room temperature for up to 3 days to keep it soft. If you want to enjoy it longer, refrigerate it but expect a slight change in texture. For optimal preservation, wrap it tightly in plastic and freeze it for up to 3 months!
Can I freeze this bread? How?
Absolutely! To freeze your Swirled Garlic Herb Bread, wrap it tightly in plastic wrap, ensuring no air gets in. Place the wrapped bread in a freezer bag or airtight container. When you’re ready to enjoy it, reheat it in the oven at 350°F (175°C) for about 10-15 minutes until warmed through.
Why is my bread not rising properly?
If your bread isn’t rising, here are a few troubleshooting tips: First, make sure your yeast is still active—if in doubt, do a quick test with warm water and sugar. Ensure you’re using warm (not hot) milk, as excessive heat can kill the yeast. Lastly, ensure the dough is placed in a warm, draft-free area for optimal rising conditions.
Can I make this recipe vegan-friendly?
Yes, you can easily adapt it! Substitute the honey with maple syrup or agave, use flax eggs (1 tablespoon ground flaxseed mixed with 2.5 tablespoons water for each egg), and replace the butter with olive oil or a dairy-free spread. These swaps will still give you a delicious and fluffy Swirled Garlic Herb Bread!
Is this recipe safe for my pets?
While garlic is a fantastic flavor enhancer for humans, it can be toxic to pets, especially dogs and cats. If you’re sharing with furry friends, ensure any pieces they enjoy are made without garlic, or simply keep this delectable Swirled Garlic Herb Bread to yourself!
Swirled Garlic Herb Bread
Ingredients
Equipment
Method
- In a large mixing bowl, combine warm milk, instant yeast, and honey. Let sit for 5-10 minutes until frothy.
- Add eggs, all-purpose flour, and salt. Mix with a dough hook for 4-5 minutes.
- Knead in softened salted butter for another 2-3 minutes until smooth.
- Transfer the dough into a lightly oiled bowl, cover, and let rise for about 1 hour.
- In another bowl, combine softened butter, minced garlic, parmesan cheese, and herbs.
- Roll the dough into a 12x18 inch rectangle, spread garlic herb butter over it.
- Roll the dough tightly into a log and cut lengthwise. Twist the halves together.
- Place on a baking sheet, cover lightly, and let rise for about 45 minutes.
- Preheat oven to 350°F (175°C) and bake for 30-35 minutes.
Leave a Reply