
As I stood in my kitchen, the enticing aroma of buttery goodness wafted through the air, reminding me of cozy family gatherings and sweet memories. If you’ve been searching for a versatile gluten-free pie crust, let me assure you—this recipe is a total game changer! Made with just five simple ingredients, you can whip up a delicious base that even those who aren’t gluten-sensitive will adore. This easy-to-make crust is perfect for both sweet and savory pies, making it a go-to recipe for any occasion. Whether you’re filling it with luscious fruits or savory delights, this pie crust ensures you won’t sacrifice taste or texture. Curious to give it a try? Let’s roll up our sleeves and create something truly special!
Why is this gluten-free crust so special?
Simplicity, with just five easy ingredients, this gluten-free pie crust caters to both novice cooks and seasoned chefs alike. Deliciously versatile, it works perfectly for sweet fillings like blueberry or savory choices such as chicken pot pie. Time-saving tips include making the dough ahead of time and freezing it for later use, ensuring you always have a reliable crust on hand. Crowd-pleasing appeal means even those without dietary restrictions will appreciate its taste and texture. If you’re curious about other delightful recipes, don’t miss out on our Apple Cider Whoopie or Spicy Chipotle Chicken. This pie crust is a must-try for anyone looking to impress at their next gathering!
Gluten-Free Pie Crust Ingredients
For the Crust
- Gluten-free all-purpose flour – Provides the necessary structure; make sure it includes xanthan gum for the best texture.
- Salt – Enhances flavor and is essential for a well-balanced crust.
- Cold unsalted butter – Adds richness and flakiness; keep it cold for optimum results by cutting it into cubes.
- Egg – Acts as a binder that gives the dough its needed cohesion.
- Ice water – Hydrates the flour and helps form the dough without it becoming sticky; add gradually for better control.
This gluten-free pie crust recipe is your go-to for all your baking adventures!
Step‑by‑Step Instructions for Gluten-Free Pie Crust
Step 1: Combine Dry Ingredients
In a large mixing bowl, whisk together 1 ½ cups of gluten-free all-purpose flour and ½ teaspoon of salt. This foundational step blends the flavors and textures for your gluten-free pie crust. Ensure there are no lumps in the flour, which will contribute to a smooth, cohesive dough later on.
Step 2: Cut in the Butter
Add ½ cup of cold unsalted butter, cut into small cubes, to the flour mixture. Using a pastry cutter or your fingers, work the butter into the flour until the mixture resembles coarse crumbs with pea-sized pieces. This step is crucial for achieving that flaky texture, so ensure the butter remains cold throughout.
Step 3: Mix in the Egg
In a separate small bowl, beat one large egg until it’s frothy. Slowly add the egg to your flour and butter mixture, stirring gently until just combined. Be careful not to over-mix—this will ensure your gluten-free pie crust maintains tenderness while binding the ingredients together.
Step 4: Add Ice Water Gradually
Begin adding ice water, one tablespoon at a time, mixing gently between additions. You want to hydrate the dough just enough that it holds together but doesn’t become sticky. Aim for about 3 to 5 tablespoons total, adjusting as needed until you can easily press the dough into a ball without it falling apart.
Step 5: Shape and Chill the Dough
Once your dough forms a cohesive ball, shape it into a disk. Wrap the disk tightly in plastic wrap and refrigerate for at least 30 minutes. This chilling step helps the butter solidify and relaxes the gluten-free flour, making it easier to roll out your crust flawlessly.
Step 6: Roll Out the Dough
After chilling, dust a clean surface and a piece of parchment paper with gluten-free flour. Place the dough disk between the parchment sheets and roll it out to about ¼ inch thickness, ensuring an even roll. This method helps prevent sticking, allowing you to achieve the perfect shape and size for your pie pan.
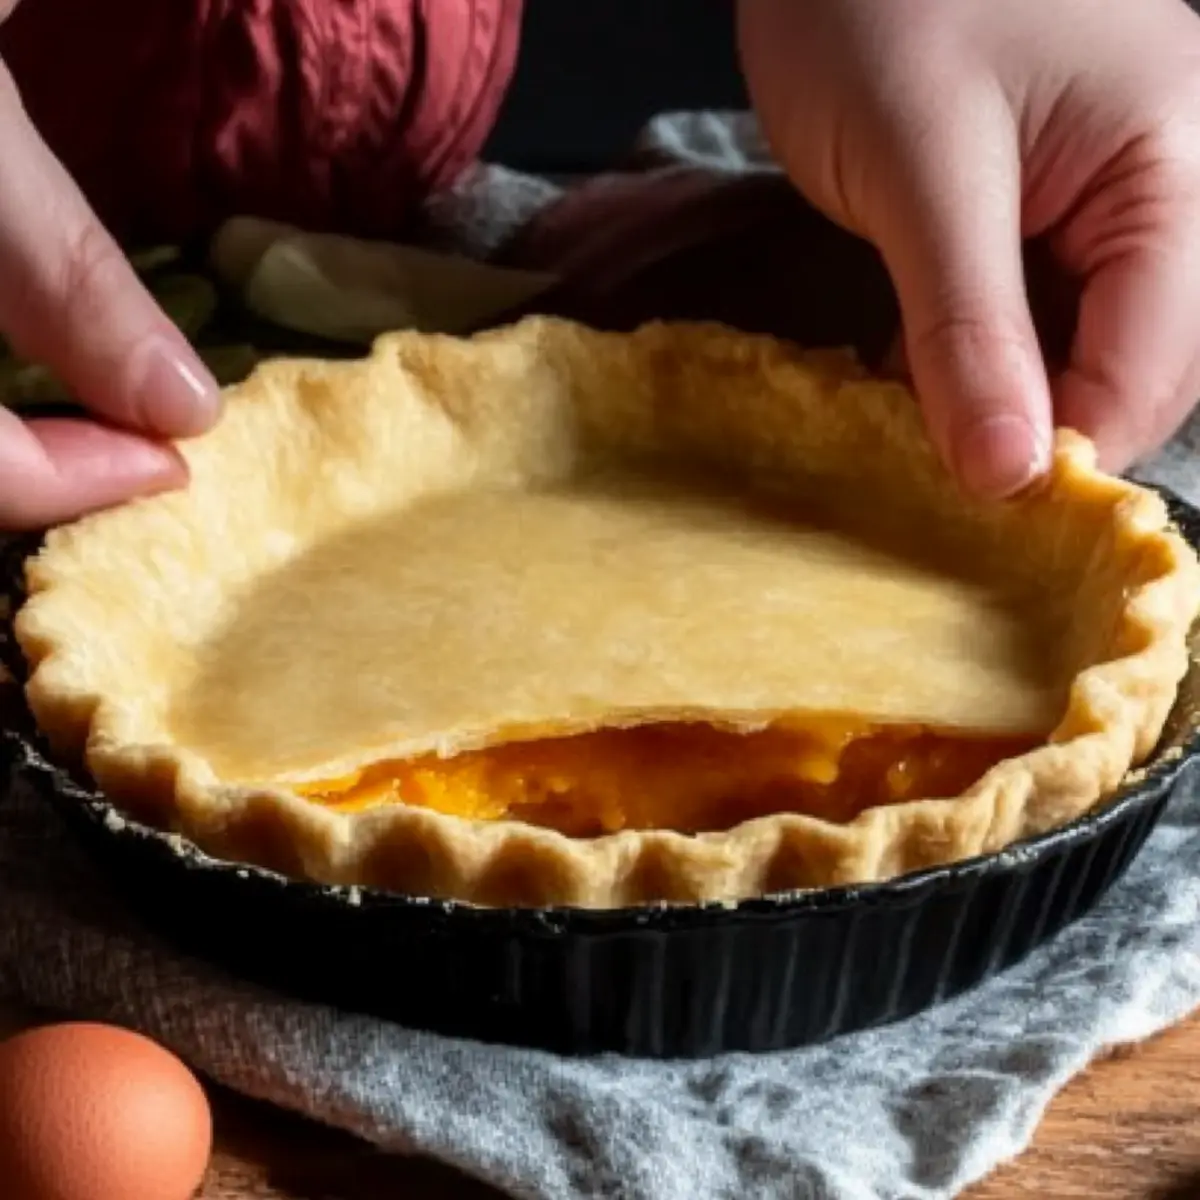
Step 7: Transfer to the Pie Pan
Carefully remove the top piece of parchment, then invert the dough into your pie pan. Gently press it into the bottom and sides, ensuring there are no air bubbles. Trim any excess dough hanging over the edges, but leave a little extra for crimping or decorating later.
Step 8: Blind Bake the Crust
Preheat your oven to 375°F (190°C). Line the crust with parchment paper and fill it with pie weights or dried beans to prevent bubbling. Bake for 15-20 minutes until the edges are lightly golden. After removing the weights, return the crust to the oven for an additional 5-10 minutes or until it achieves a beautiful golden brown color.
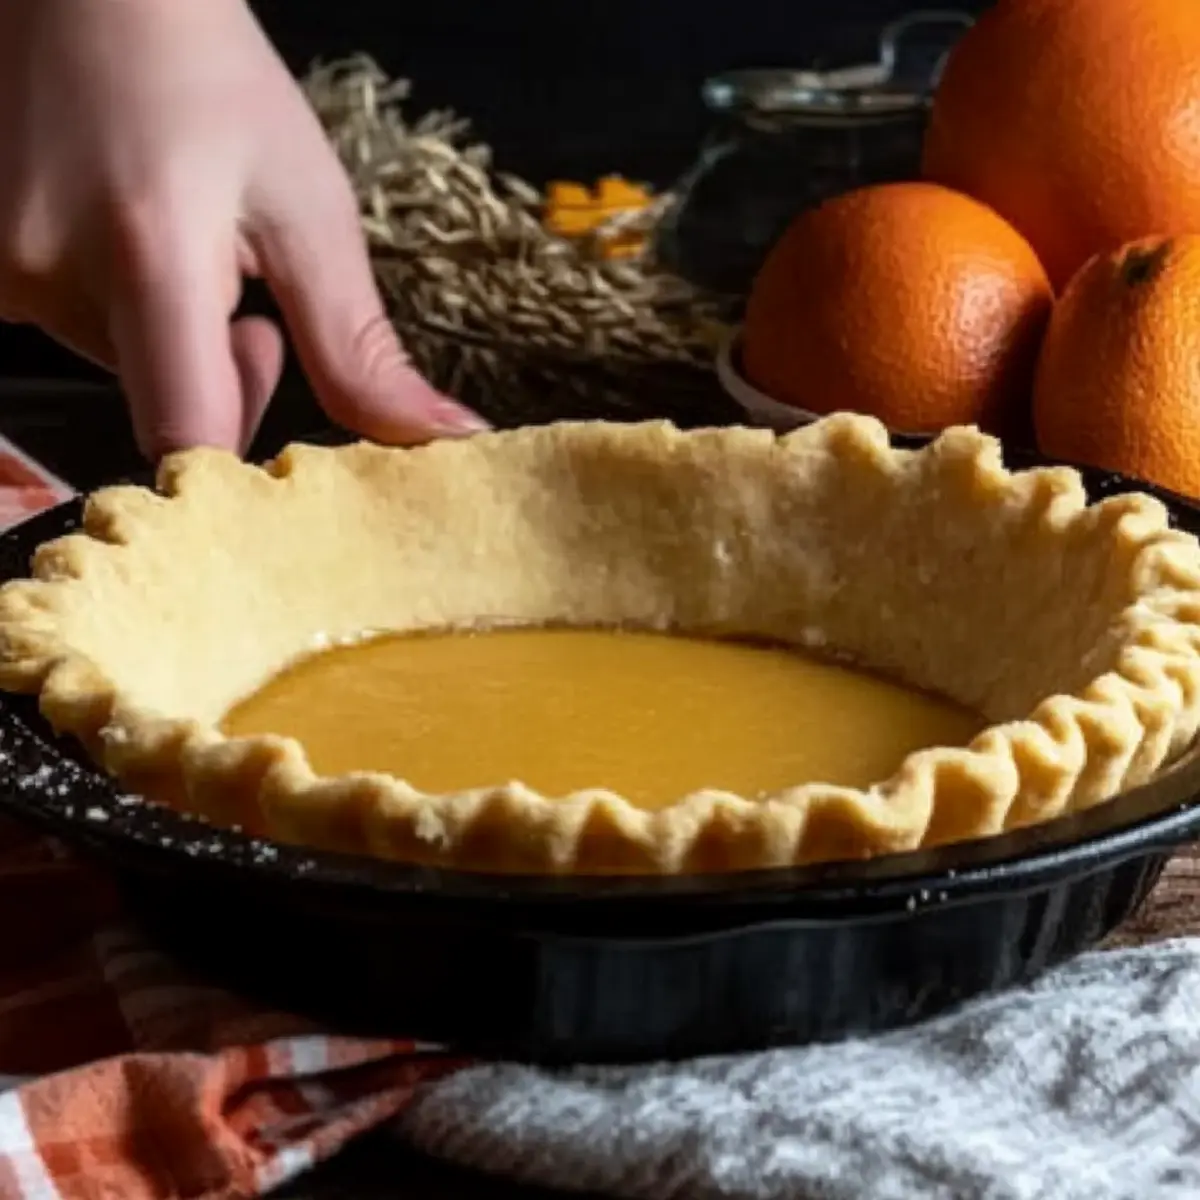
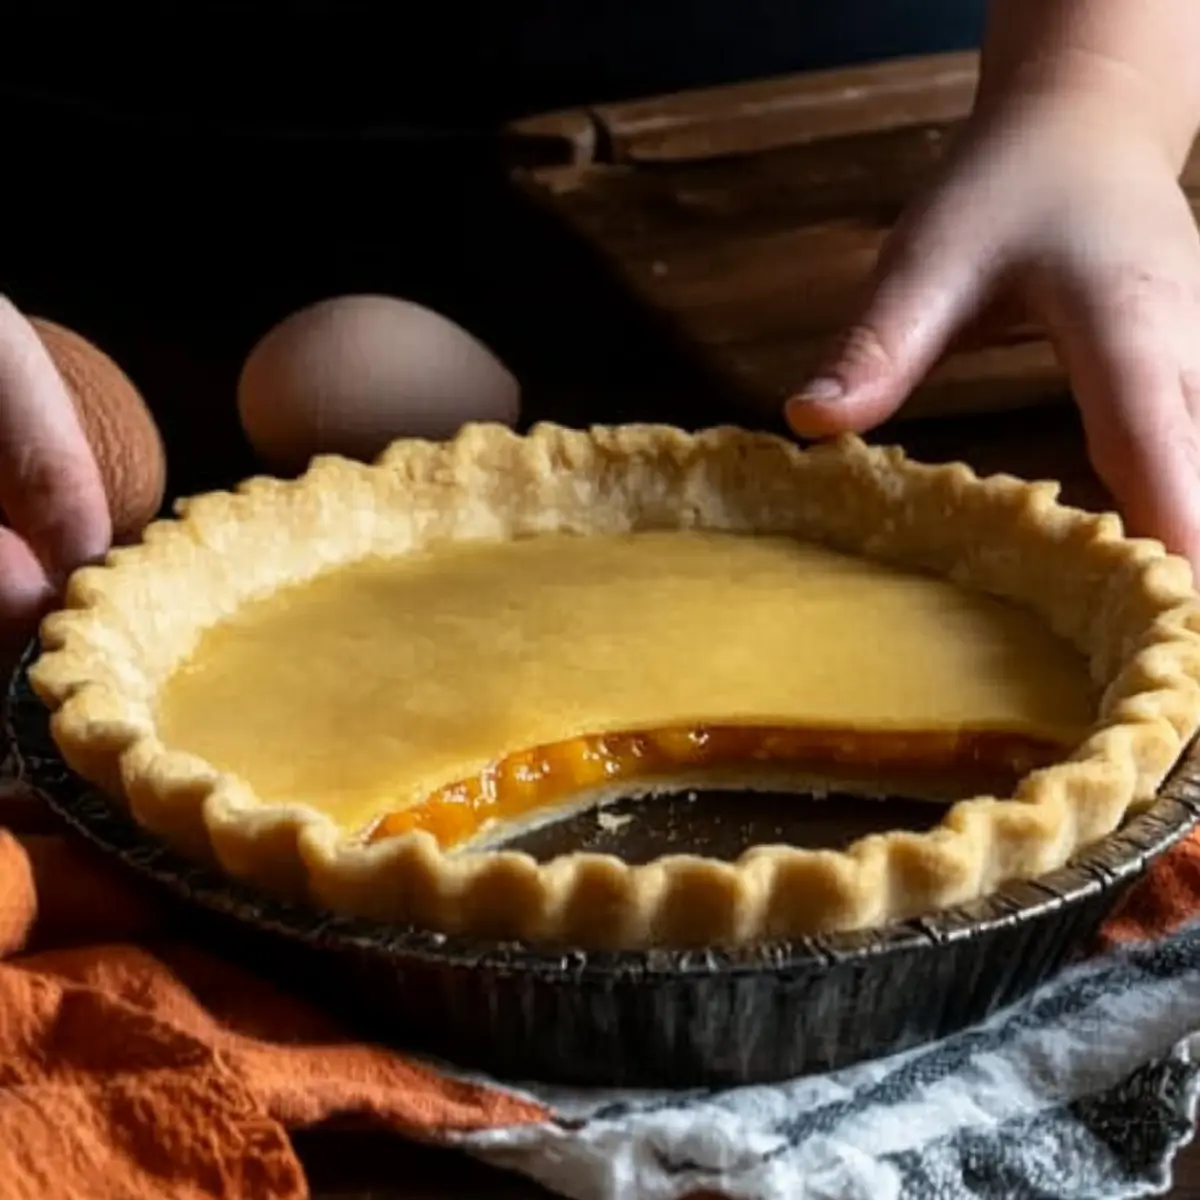
Step 9: Cool and Fill
Once baked, remove the crust from the oven and allow it to cool completely before adding your favorite filling. This gluten-free pie crust is ready to be filled with sweet or savory delights, providing a delicious base for all your baking adventures.
Gluten-Free Pie Crust Variations
Customize your gluten-free pie crust with these creative twists that will elevate your baking game and delight every palate!
-
Flour Alternatives: Swap gluten-free all-purpose flour for almond or coconut flour for nutty flavors. Just remember, each flour yields a slightly different texture.
-
Savory Herbs: Add fresh herbs like rosemary or thyme for a savory twist, perfect for quiches or pot pies. These delightful flavors create an aromatic blend that your guests will love.
-
Sweet Spice: Incorporate a sprinkle of cinnamon or nutmeg for a hint of sweetness, ideal for pumpkin or apple pies. This warming spice twist adds depth that complements fruit beautifully.
-
Cheesy Crust: Mix in grated Parmesan or cheddar cheese for added flavor and a delightful crunch. This cheesy variation is fantastic for savory pies like chicken pot pie, perfect for family gatherings.
-
Nutty Crunch: Fold in ground nuts like walnuts or pecans for an extra crunchy texture. This adds a beautiful nutty flavor that pairs wonderfully with sweet fillings.
-
Cocoa Powder: Turn your pie crust into a chocolate delight by adding unsweetened cocoa powder for dessert pies. This gives a rich taste that works wonderfully with chocolate ganache fillings.
-
Spicy Kick: For those who love heat, add a pinch of cayenne pepper or chili powder for a spicy kick. This unexpected twist will surprise and delight your taste buds!
Don’t stop here—if you’re looking for more delicious recipes, try the comforting Lobster Pot Pie or the delightful Apple Cider Whoopie cookies. With each variation, you’re tailoring this gluten-free pie crust to your heart’s desire!
Expert Tips for Gluten-Free Pie Crust
-
Keep Ingredients Cold: Ensure all ingredients, especially the butter, are cold to achieve the perfect flaky texture in your gluten-free pie crust.
-
Don’t Overmix: Mix the dough only until just combined to prevent toughness. Overworking the dough can lead to a less tender crust.
-
Chill the Dough: Always refrigerate the dough for at least 30 minutes. This helps solidify the butter and relaxes the flour for easier rolling.
-
Use Parchment Paper: When rolling out the dough, place it between two sheets of parchment paper. This prevents sticking and helps maintain shape.
-
Blind Bake Wisely: For an even golden crust, use pie weights or dried beans during blind baking. This prevents bubbling and ensures a smooth finish.
-
Making Ahead: You can prepare the gluten-free pie crust in advance and freeze it. Thaw overnight before use for added convenience.
Storage Tips for Gluten-Free Pie Crust
Room Temperature: Once baked, store the gluten-free pie crust at room temperature in an airtight container for up to 3 days to maintain its freshness.
Fridge: If you plan to use the crust within a few days, wrap it tightly in plastic wrap and refrigerate for up to a week without compromising quality.
Freezer: For longer storage, freeze the unbaked gluten-free pie crust wrapped in plastic wrap and placed in a freezer bag for up to 2 months. Thaw overnight in the fridge before use.
Reheating: To reheat a baked gluten-free pie crust, place it in a preheated oven at 350°F (175°C) for about 10-15 minutes until warmed through and crisp again.
Make Ahead Options
These gluten-free pie crusts are perfect for busy home cooks looking to save time in the kitchen! You can prepare the dough up to 3 days in advance and store it wrapped tightly in plastic wrap in the refrigerator to maintain its quality. For longer storage, feel free to freeze the wrapped dough for up to 2 months; just remember to thaw it overnight in the fridge before using. When you’re ready to bake, simply roll out the chilled dough, fit it into your pie pan, and proceed with blind baking as directed. With these make-ahead options, you’ll enjoy fresh, delicious gluten-free pie crusts with minimal last-minute effort!
What to Serve with Easy Gluten-Free Pie Crust
The perfect pie crust sets the stage for an unforgettable meal experience, whether sweet or savory, comforting or adventurous.
-
Luscious Fruit Filling: Bright, sweet fruits like blueberries or cherries burst with flavor, creating a delightful contrast against the flaky crust.
-
Savory Quiche: A rich, egg-based quiche filled with creamy cheese and vibrant vegetables pairs impeccably with the crumbly texture of this pie crust.
-
Homemade Whipped Cream: Light and airy, freshly whipped cream adds a delightful finish to sweet pies, enhancing their flavors with a velvety touch.
-
Creamy Mashed Potatoes: Silky, buttery mashed potatoes provide a comforting and savory element, making it an ideal side for a pot pie.
-
Refreshing Salad: A crisp, lightly-dressed salad made with mixed greens and vibrant vegetables balances the richness of the pie, enhancing your meal’s freshness.
-
Decadent Chocolate Sauce: Drizzling warm chocolate sauce over a slice of pie can elevate the dessert experience, bringing richness that pairs beautifully with the crust.
-
Sweet Ice Cream: A scoop of vanilla or any flavor of ice cream adds a cold, creamy dimension to a warm pie, making each bite a delightful contrast.
-
Fruit Compote: Warm fruit compote drizzled over the pie enhances both taste and presentation, offering a pop of flavor that complements the crust perfectly.
Gluten-Free Pie Crust Recipe FAQs
How do I choose the best gluten-free flour for this pie crust?
Absolutely! Look for a gluten-free all-purpose flour that contains xanthan gum as it’s crucial for binding. If the flour doesn’t have xanthan gum, adding ½ teaspoon separately will help achieve that desired texture.
How should I store my unbaked gluten-free pie crust?
I recommend wrapping your unbaked gluten-free pie crust tightly in plastic wrap and placing it in a freezer bag to keep it fresh. You can freeze it for up to 2 months! When you’re ready to use it, simply thaw it overnight in the fridge.
What’s the best way to store baked gluten-free pie crust?
Keep your baked crust in an airtight container at room temperature for up to 3 days. If you won’t be using it right away, wrap it tightly in plastic wrap and refrigerate it for up to a week—just ensure it’s completely cool before wrapping to prevent sogginess.
Can I freeze the baked gluten-free pie crust?
Sure! To freeze an already baked gluten-free pie crust, let it cool completely. Wrap it tightly in plastic wrap and then place it in a freezer bag. It can be frozen for up to 3 months. To use, thaw it in the fridge overnight and reheat at 350°F (175°C) for about 10-15 minutes before filling.
What if my gluten-free dough is too sticky?
Don’t worry too much if your gluten-free pie crust dough becomes sticky! This can happen if you add too much water. Next time, try adding water gradually, one tablespoon at a time, until the dough just comes together. If you find it’s too sticky, sprinkle a little extra gluten-free flour on your work surface while rolling out.
Is this pie crust safe for people with allergies?
Yes! This gluten-free pie crust is a great alternative for those with wheat allergies. Always check your ingredients to ensure they are gluten-free and don’t contain any allergens relevant to your personal dietary needs. Enjoy baking with peace of mind!

Deliciously Easy Gluten-Free Pie Crust for Perfect Pies
Ingredients
Equipment
Method
- In a large mixing bowl, whisk together gluten-free flour and salt.
- Add cold unsalted butter to the flour mixture and work until crumbly.
- Beat the egg in a separate bowl and mix into the flour mixture.
- Gradually add ice water, mixing until the dough holds together.
- Shape the dough into a disk, wrap in plastic wrap, and refrigerate for 30 minutes.
- Roll out the dough between parchment papers to about ¼ inch thickness.
- Transfer the rolled dough to the pie pan, pressing gently into place.
- Blind bake in a preheated oven at 375°F (190°C) for 15-20 minutes.
- Cool the crust completely before adding your favorite filling.
Leave a Reply