
The tantalizing aroma of freshly baked pizza can instantly transport me to my favorite pizzeria, but what if I told you there’s a way to enjoy that comforting experience without the carbs? Introducing my Cottage Cheese Pizza Crust No Flour, a game-changing recipe that offers a crispy texture and satisfying chew, making it a perfect fit for those on a low-carb or keto journey. Not only is this crust incredibly quick and easy to whip up, but it also packs a high-protein punch, helping you nourish your body while savoring every bite. Whether you choose to top it with classic tomato sauce and cheese or create a cottage cheese flatbread pizza, you’ll find that wholesome homemade goodness is just a bake away. Ready to dive into the delicious world of guilt-free pizza?
Why Choose Cottage Cheese for Pizza Crust?
Crispy Texture: This Cottage Cheese Pizza Crust No Flour delivers a delightful crunch without the guilt, providing a satisfying base for your favorite toppings.
Protein Power: Packed with high-protein ingredients, this crust not only satisfies cravings but also supports your health goals—perfect for a post-workout meal!
Quick and Easy: In just a few simple steps, you can have a homemade crust that’s ready to bake—no complicated processes involved!
Versatile Options: Create variations such as a cottage cheese flatbread pizza or use this crust as a base for your favorite savory toppings for a satisfying meal any time.
Family-Friendly: This recipe is a hit with kids and adults alike, giving everyone a delicious way to enjoy pizza night without the heaviness of traditional dough.
Let your creativity shine and explore different toppings to customize your crisp crust. You may also enjoy pairing it with side dishes like a fresh salad or roasted vegetables for a well-rounded meal!
Cottage Cheese Pizza Crust No Flour Ingredients
For the Pizza Crust
• Cottage Cheese – Provides a high-protein, low-carb base; opt for low-fat varieties for a lighter option.
• Eggs – Binds the crust together and adds moisture; substitute with flaxseed meal mixed with water for a vegan alternative.
• Shredded Mozzarella – Offers great flavor and a chewy texture; dairy-free cheese works well for those on a vegan diet.
• Salt – Enhances the overall flavor; adjust to taste or choose a low-sodium option if needed.
• Herbs/Seasonings – Optional ingredients like dried oregano or garlic powder can add a delightful aroma and extra flavor—feel free to get creative!
Optional Toppings
• Tomato Sauce – A classic choice, adds richness and moisture to your pizza; consider homemade sauce for an extra touch.
• Fresh Vegetables – Top with fresh bell peppers, mushrooms, or spinach for added nutrients and color.
• Cooked Meats – Pepperoni, chicken, or sausage can all elevate your pizza crust to hearty meal status; choose lean options for a healthier bite.
• Fresh Herbs – Garnish with basil or parsley for a fresh, aromatic finish right before serving.
Now, let’s roll up our sleeves and get started on this delightful adventure in guilt-free pizza indulgence!
Step‑by‑Step Instructions for Cottage Cheese Pizza Crust No Flour
Step 1: Preheat the Oven
Begin by preheating your oven to 375°F (190°C). This temperature is key to achieving that perfect crispy edge on your Cottage Cheese Pizza Crust No Flour. While the oven is heating, gather your mixing bowl and other ingredients, ensuring you have everything ready for a smooth preparation.
Step 2: Combine the Ingredients
In a large mixing bowl, add 1 cup of cottage cheese, 2 eggs, and 1 cup of shredded mozzarella cheese. Mix everything until you have a smooth, creamy consistency. No lumps should remain, as this will create a delightful texture in your crust. Feel free to add in salt and herbs to enhance the flavor during this step.
Step 3: Prepare the Baking Sheet
Line a baking sheet with parchment paper to prevent sticking and make cleanup easier. Using a spatula or the back of a spoon, carefully spread the cottage cheese mixture onto the sheet, forming it into a round or rectangular pizza crust shape about ½-inch thick. Aim for even edges for uniform baking.
Step 4: Bake the Crust
Place the crust in the preheated oven and bake for 20-25 minutes. Keep an eye on it towards the end; you’re looking for a golden color around the edges and a firm texture in the center. This step is crucial for achieving that desired crispy exterior on your Cottage Cheese Pizza Crust No Flour.
Step 5: Cool the Base
Once baked to perfection, remove the crust from the oven and allow it to cool on the baking sheet for about 5-10 minutes. This cooling time helps the crust firm up even more, making it easier to add your toppings without disrupting its structure.
Step 6: Top Your Pizza
Now comes the fun part! Spread your favorite sauce across the surface of the crust, then layer on your desired toppings, like fresh vegetables or cooked meats. Be creative! Once topped, you can either serve immediately or return it to the oven for an additional 5-10 minutes to heat everything through and melt the cheese.
Step 7: Serve and Enjoy
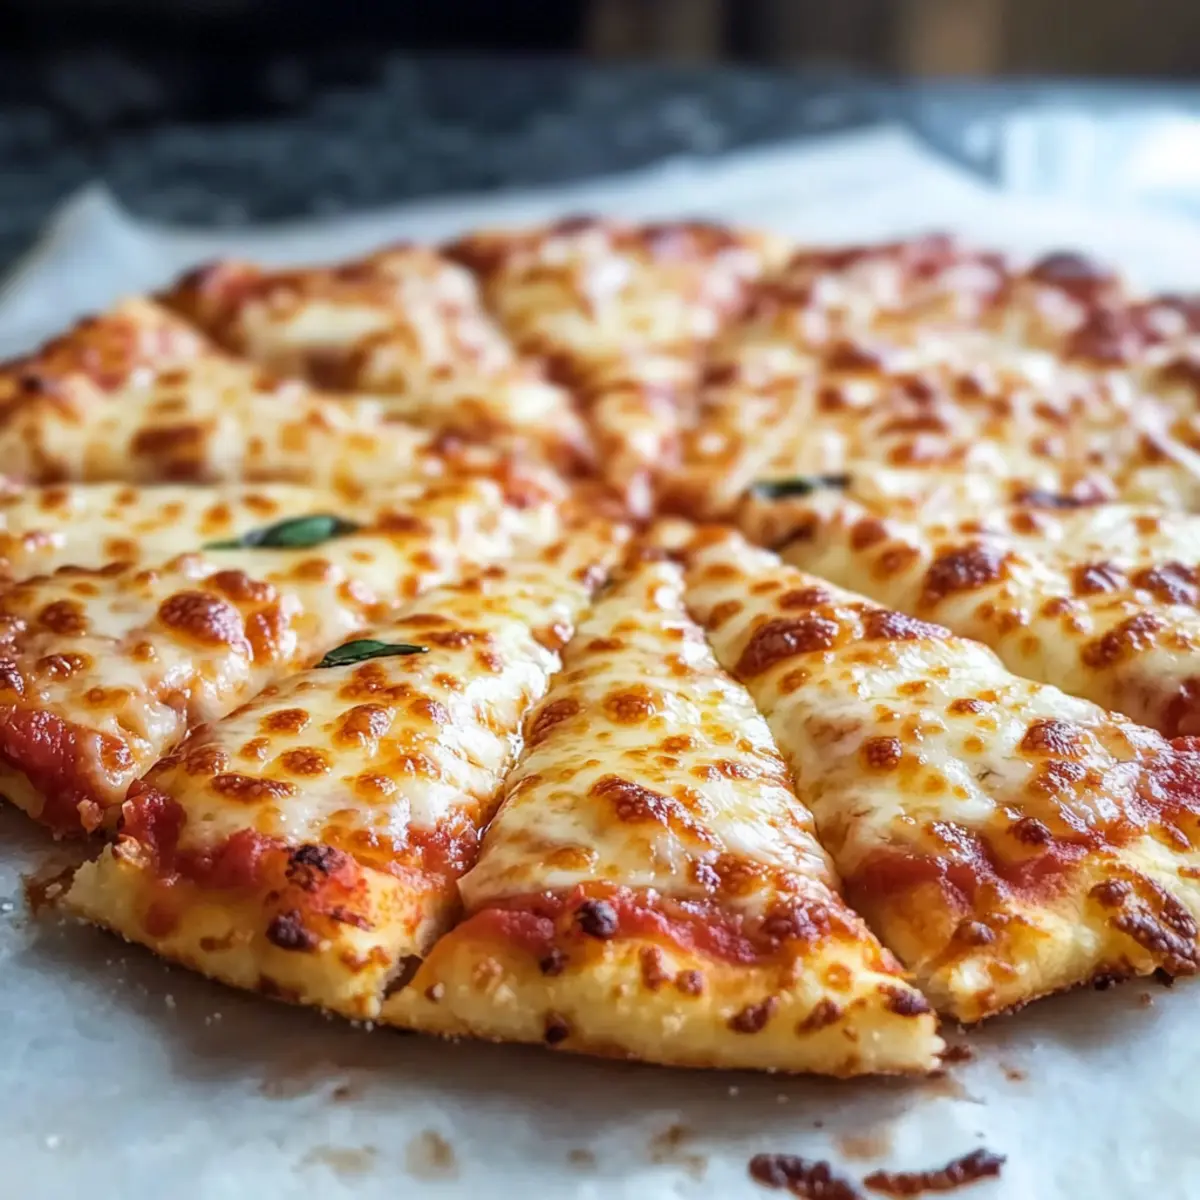
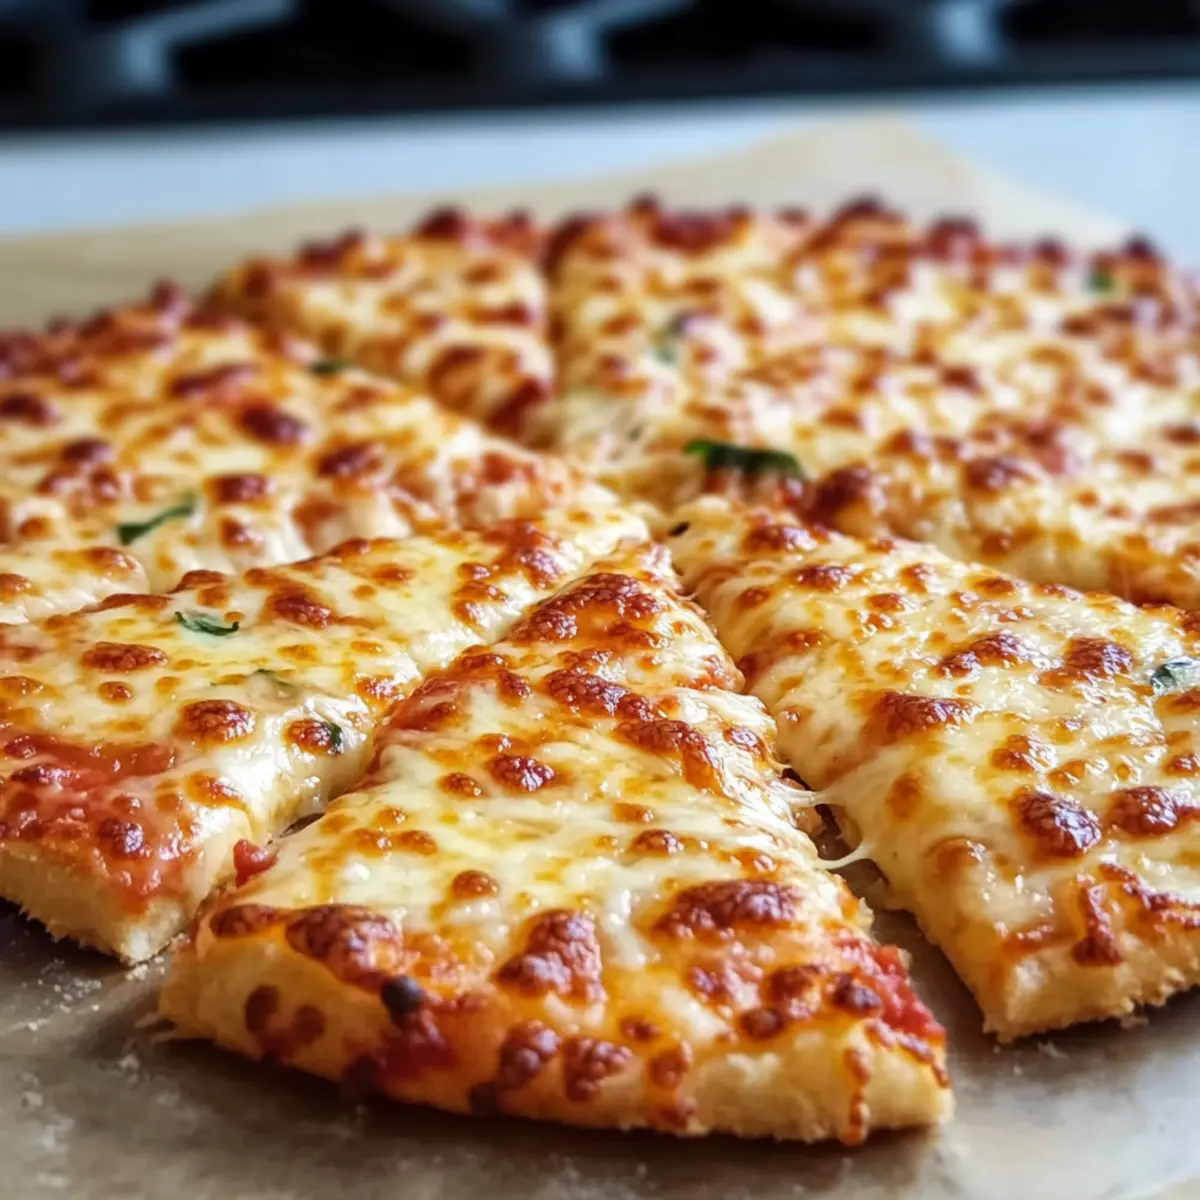
Finally, once your toppings are heated and bubbly, remove the pizza from the oven. Let it cool slightly before slicing it into portions. This Cottage Cheese Pizza Crust No Flour is perfect for sharing or savoring all by yourself. Enjoy your guilt-free indulgence!
Make Ahead Options
These Cottage Cheese Pizza Crust No Flour options are perfect for busy weeknights! You can prepare the crust up to 24 hours in advance—simply follow all steps until baking, then let it cool completely before storing it in an airtight container in the refrigerator. If you plan to enjoy this low-carb delight later, you can even freeze the baked crust for up to 3 months; just layer with parchment to prevent sticking. When you’re ready to serve, top your crust with sauce and your favorite toppings, then bake at 375°F (190°C) for about 10-15 minutes until heated through. This way, you’ll have a delicious, homemade pizza ready to go with minimal effort!
What to Serve with Cottage Cheese Pizza Crust No Flour
Elevate your pizza night experience with perfect pairings that complement the crispy delight of this guilt-free crust.
- Fresh Garden Salad: Crisp greens and seasonal veggies create a refreshing contrast to the warm, savory pizza, enhancing each bite.
- Roasted Vegetables: Caramelized carrots, broccoli, or bell peppers bring out earthy flavors, making the meal vibrant and nutritious.
- Garlic Breadsticks: For those who love extra carbs, lightly seasoned breadsticks work as a wonderful companion to soak up any additional sauce.
- Zesty Coleslaw: Crunchy, tangy coleslaw adds a delightful coolness, balancing the hearty richness of the pizza.
- Savory Antipasto Platter: A mix of olives, cheeses, and cured meats complements the flavor profile, providing a gourmet touch to your meal.
- Chilled White Wine: A chilled Sauvignon Blanc or Pinot Grigio refreshes the palate, marrying beautifully with the flavors of your pizza.
- Crispy Potato Wedges: Seasoned to perfection, these wedges offer a satisfying crunch that mirrors the pizza’s texture and creates a comforting combo.
- Fruit Salad: A light, sweet fruit salad with berries and melons serves as a refreshing cleanse after the rich flavors of the pizza.
How to Store and Freeze Cottage Cheese Pizza Crust
Fridge: Store leftover Cottage Cheese Pizza Crust in an airtight container for up to 4 days to maintain its freshness and crispiness.
Freezer: To freeze, stack layers of the crust between parchment paper, place them in a freezer bag, and keep for up to 3 months for convenient future meals.
Reheating: To restore the crust’s delightful crispiness, reheat in an oven or air fryer instead of the microwave, which can make it soggy.
Make-Ahead: Prepare several crusts in advance and store them wrapped in plastic wrap in the fridge for quick weeknight dinners without the hassle.
Cottage Cheese Pizza Crust No Flour Variations
Feel free to get creative and customize your pizza crust to suit your tastes and dietary needs.
- Dairy-Free: Use dairy-free cheese and flaxseed meal instead of eggs for a vegan-friendly twist.
- Spicy Kick: Add diced jalapeños or crushed red pepper flakes to the batter for a little heat.
- Cheesy Variation: Swap mozzarella with cheddar or pepper jack for a deeper flavor profile—each brings its own twist!
- Herby Delight: Mix in fresh herbs like basil or oregano for a fragrant burst—this elevates any topping you choose!
- Flatbread Style: Flatten the mixture into a thinner layer for a crunchy flatbread base, perfect for dipping or appetizers.
- Cottage Cheese Pizza Bowl: Skip the crust completely and make a pizza bowl by combining your favorite toppings directly with the cottage cheese—fun and delicious!
- Sweet Twist: Consider making a dessert pizza by adding vanilla extract and a sprinkle of cinnamon to your crust, then topping it with fresh fruit.
- Veggie Booster: Fold in chopped spinach or grated zucchini into the mixture for an extra nutrient punch—this adds flavor and moisture!
Whenever you’re ready to explore more creative options, be sure to check out Crockpot Cheese Tortellini for a comforting dish or try our delightful Pumpkin Cream Cheese for a seasonal treat!
Expert Tips for Cottage Cheese Pizza Crust No Flour
- Avoid Runny Batter: Ensure the mixture isn’t too wet; balance cottage cheese and shredded mozzarella for ideal thickness and consistency.
- Baking Sheet Prep: Always use parchment paper to prevent sticking and make cleanup a breeze; this keeps your Cottage Cheese Pizza Crust No Flour intact.
- Crisp Finish: For extra crunch, pre-bake the plain crust for 5 minutes before adding toppings, enhancing the overall texture.
- Cool Before Topping: Allow the crust to cool slightly after baking; this helps it hold its shape and prevents sogginess when you add sauce and toppings.
- Creative Toppings: Experiment with seasonal veggies and herbs to elevate your pizza; remember, the toppings are just as important as the crust!

Cottage Cheese Pizza Crust No Flour Recipe FAQs
What type of cottage cheese should I use?
Absolutely! For the best results, choose low-fat cottage cheese, as it provides the right balance of flavor and texture without adding excess calories. Look for options that are smooth and creamy, avoiding any with large curds for a more consistent crust.
How should I store leftover crust?
Very! Store your leftover Cottage Cheese Pizza Crust in an airtight container in the fridge for up to 4 days. If you want to keep it longer, layer the crust in between parchment paper, then place it in a freezer-safe bag to freeze for up to 3 months. This method prevents sticking and keeps the crust intact.
Can I freeze the prepared crust?
Definitely! To freeze the Cottage Cheese Pizza Crust, first bake it as directed. Once cooled, stack it with parchment paper between layers to prevent sticking, then place it in a freezer bag. For optimal freshness, aim to use it within 3 months. When you’re ready to use it, thaw in the fridge overnight and reheat in the oven.
What if my crust is too runny?
No worries! If your dough appears too runny, mix in a bit more shredded mozzarella or a small amount of almond flour to thicken it up. The right consistency should be similar to pancake batter, easily spreadable but not liquid. Adjusting the cheese ratio tends to solve this issue perfectly.
Are there any dietary considerations for allergies?
Yes, be mindful! If you or your loved ones have dairy allergies, consider using dairy-free cheese alternatives and flaxseed meal mixed with water instead of eggs for a vegan version. Always check ingredient labels for any potential allergens and choose low-sodium options if necessary.

Cottage Cheese Pizza Crust No Flour for Guilt-Free Indulgence
Ingredients
Equipment
Method
- Preheat your oven to 375°F (190°C).
- In a large mixing bowl, add cottage cheese, eggs, and shredded mozzarella. Mix until smooth.
- Line a baking sheet with parchment paper and spread the mixture into crust shape.
- Bake for 20-25 minutes until golden and firm.
- Allow the crust to cool for 5-10 minutes before adding toppings.
- Spread sauce over the crust and add your desired toppings.
- Return to the oven for an additional 5-10 minutes to heat through.
- Let it cool slightly before slicing and serving.
Leave a Reply