
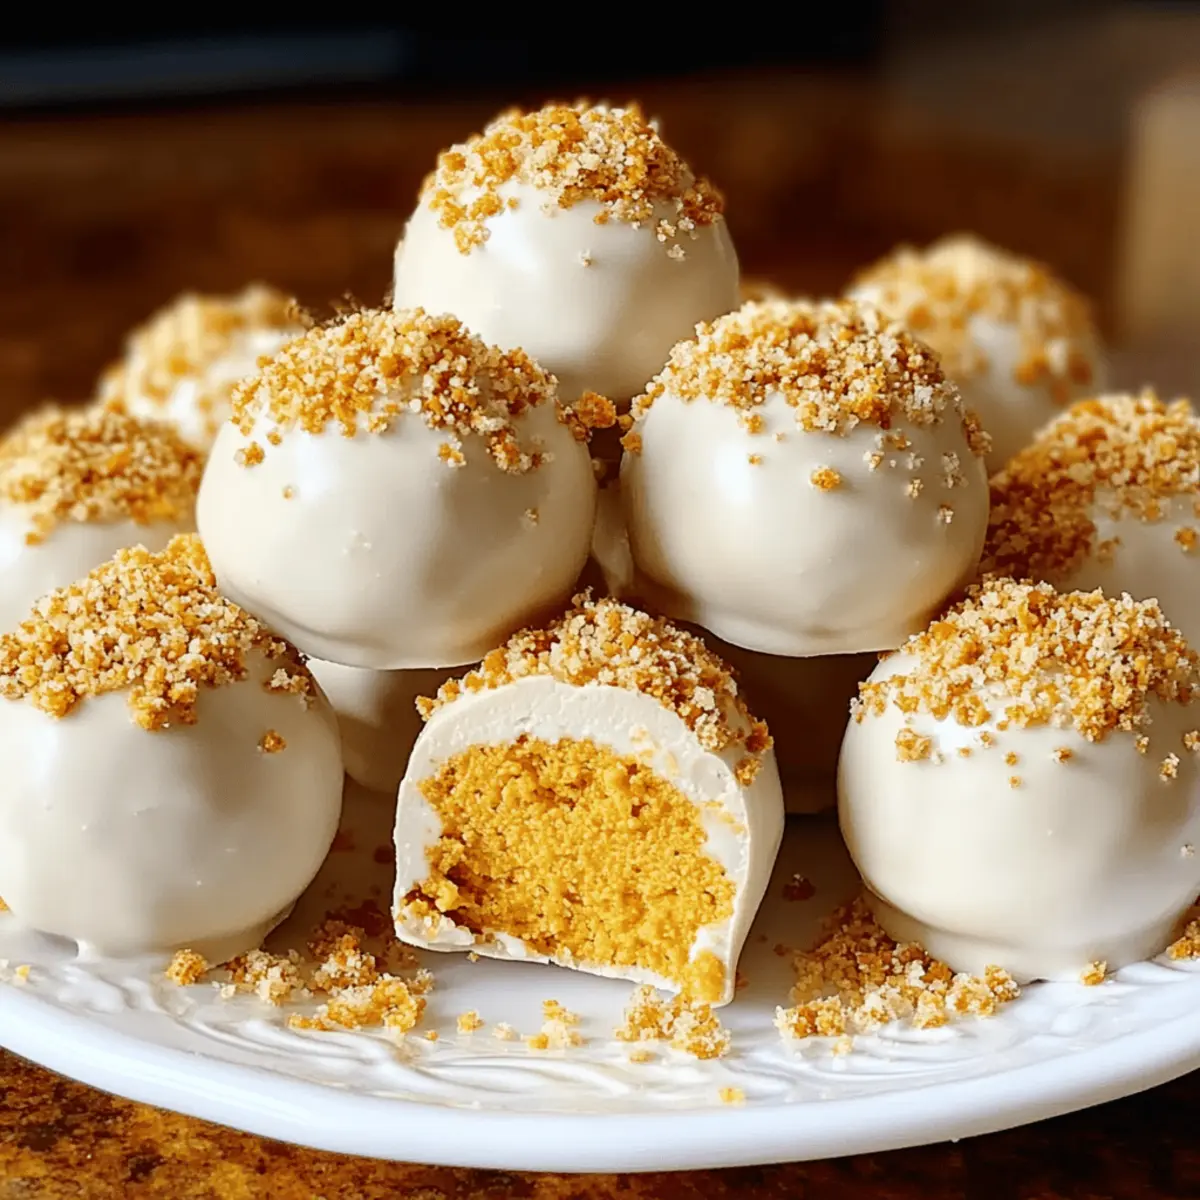
“Oh no, my pumpkin pie is still in the oven, and guests are arriving!” If this ever happens to you during the bustling holiday season, I’ve got just the solution. My Easy No-Bake Pumpkin Cheesecake Balls are the antidote to that kitchen chaos! These delightful, bite-sized treats blend the creamy goodness of pumpkin cheesecake with minimal effort, allowing you to whip up a holiday dessert in no time. Perfectly spiced with warm pumpkin flavors, they’re not only a crowd-pleaser for parties, but they also serve as a make-ahead option when your oven is occupied. With the freedom to customize these little gems, you can easily cater to gluten-free diets by swapping in gluten-free cookie crumbs. So, if you’re ready to discover a sweet solution that will impress family and friends alike, stick around to learn how to make these irresistibly creamy No-Bake Pumpkin Cheesecake Balls. What flavor twist will you try on your first batch?
Why Are These No Bake Pumpkin Cheesecake Balls Perfect?
Simplicity at Its Best: Creating these No Bake Pumpkin Cheesecake Balls requires minimal effort, making them a breeze even for first-time bakers.
Versatile Flavor: The recipe allows for a variety of swaps, from using gingersnap crumbs for a spicier kick to experimenting with different chocolate coatings.
Crowd-Pleasing Delight: These bite-sized treats are sure to impress guests at any gathering, making them the ideal festive addition to your dessert spread.
Make-Ahead Convenience: With a quick chill time, you can prepare them in advance, freeing up time for other holiday preparations.
Gluten-Free Options: Easily customizable for gluten-free lifestyles, just switch to gluten-free cookie crumbs for the same deliciousness without worry. Want to pair them with something warm? Try serving them with a cup of Maple Pumpkin Coffee for a delightful experience!
No Bake Pumpkin Cheesecake Balls Ingredients
For the Cheesecake Mixture
• Cream Cheese – Provides richness and a smooth texture; full-fat is best for that creamy filling.
• Pumpkin Purée – Adds essential pumpkin flavor and moisture; use 100% pure pumpkin for best results.
• Graham Cracker or Gingersnap Crumbs – Gives texture and flavor; gluten-free options are available for those who need it.
• Powdered Sugar – Sweetens the mixture while keeping it smooth; adjust based on the sweetness of your crumbs.
• Pumpkin Pie Spice and Cinnamon – Essential for bringing that cozy fall flavor; create your own blend if desired.
• Vanilla and Salt – Enhances the overall flavor and balances the sweetness.
For the Coating
• Chocolate (White, Dark, or Candy Melts) – Forms a luscious outer layer; add coconut oil to thin it out for easier dipping.
For the Garnish
• Crushed Cookies or Festive Sprinkles – Adds a decorative touch and a bit of crunch; choose festive options for a holiday vibe.
Whip up these delightful No Bake Pumpkin Cheesecake Balls with these simple ingredients, and watch your gatherings transform into a festive celebration!
Step‑by‑Step Instructions for No Bake Pumpkin Cheesecake Balls
Step 1: Prepare the Pumpkin
Start by blotting the 100% pure pumpkin purée with paper towels for about 5 minutes to remove excess moisture, ensuring a firmer filling. Using less moisture will result in a better texture for your No Bake Pumpkin Cheesecake Balls. Set the prepared pumpkin aside while you gather your other ingredients.
Step 2: Mix the Filling
In a large mixing bowl, beat 8 ounces of cream cheese with an electric mixer on medium speed until smooth and creamy, about 2-3 minutes. Gradually add the blotted pumpkin purée, powdered sugar, pumpkin pie spice, cinnamon, vanilla extract, and a pinch of salt. Mix until the filling is velvety and well combined, approximately 3-4 minutes.
Step 3: Incorporate Cookie Crumbs
Gently fold in 1¼ cups of graham cracker or gingersnap crumbs into the cream cheese and pumpkin mixture. Keep mixing until the combination is soft but not sticky, allowing the crumbs to bind everything together. Cover the bowl and chill the mixture in the refrigerator for 15-20 minutes to make it easier to roll into balls.
Step 4: Form the Balls
Once chilled, take about a tablespoon of the mixture and use a scoop or your hands to roll it into small balls, about 1 inch in diameter. Place each shaped ball on a parchment-lined sheet pan, ensuring they are spaced evenly. Return the pan to the refrigerator to chill for another 15-20 minutes to firm up before coating.
Step 5: Melt the Coating
While the cheesecake balls chill, melt your choice of chocolate (white, dark, or candy melts) in a microwave-safe bowl. Heat in 20-30 second intervals, stirring after each interval until smooth, which usually takes about 1-2 minutes. If the mixture is too thick, stir in a teaspoon of coconut oil for easier dipping.
Step 6: Dip the Balls
Once melted, dip each chilled pumpkin cheesecake ball into the coating, ensuring it’s evenly covered. Gently tap off any excess coating before placing the dipped balls back on the parchment paper. Work quickly to avoid having the balls warm up, which may cause them to lose their shape.
Step 7: Garnish
Immediately sprinkle crushed cookies, festive sprinkles, or drizzle with additional melted chocolate on top of the dipped balls. This adds a decorative touch and a delightful texture contrast. Allow the garnished balls to sit for a few minutes, letting the coating set a bit before serving.
Step 8: Set and Serve
To fully set the coating, allow the No Bake Pumpkin Cheesecake Balls to sit at room temperature for 10-15 minutes. For a quicker option, refrigerate them for an extra 10 minutes. Once set, serve these delicious treats at room temperature to enjoy the best creamy texture.
What to Serve With Easy No-Bake Pumpkin Cheesecake Balls
Indulging in these creamy delights is even better when you complement them with delightful sides and beverages that enhance their festive flavors.
-
Spiced Apple Cider: Warm spiced apple cider complements the fall flavors beautifully and creates a cozy ambiance.
-
Gingerbread Cookies: The ginger spice in these cookies harmonizes perfectly with the pumpkin spice, enhancing your sweet treat experience. Serve them alongside for a lovely festive flair.
-
Whipped Cream: Light and airy, whipped cream adds creaminess and balances the richer cheesecake balls, making for a delightful combination.
-
Chocolate Drizzle: A simple drizzle of melted chocolate on top of the balls elevates their presentation and adds an extra layer of sweetness.
-
Pecan Pie Bites: The rich, nutty flavors of mini pecan pies are a classic pairing that will delight your guests and extend the festive spirit.
-
Coffee or Espresso: Pair these treats with a steaming cup of freshly brewed coffee or a shot of espresso for a perfect afternoon pick-me-up.
-
Pumpkin Spice Latte: Embrace the full pumpkin experience with a luscious pumpkin spice latte, making your dessert even more seasonal.
-
Cheesecake Platter: Create a dessert board including various cheesecake options to provide different textures and flavors, keeping your gathering exciting.
These pairings not only elevate your No Bake Pumpkin Cheesecake Balls but also create a warm atmosphere for family and friends to savor together.
Make Ahead Options
These Easy No-Bake Pumpkin Cheesecake Balls are perfect for meal prep, allowing you to savor festive flavors without the stress! You can prepare the cheesecake mixture and form the balls up to 24 hours in advance; simply chill them in the refrigerator after shaping. This keeps the texture just right and allows flavors to meld beautifully. For best results, store them in an airtight container to prevent drying out. When you’re ready to serve, dip the chilled balls in your preferred coating, garnish, and let them set at room temperature for about 10-15 minutes before enjoying. These treats are just as delicious, making your busy weeknights a little sweeter!
Storage Tips for No Bake Pumpkin Cheesecake Balls
Fridge: Undipped No Bake Pumpkin Cheesecake Balls can last up to 2-3 days in an airtight container. If dipped, they stay fresh for about 4-5 days.
Freezer: These delightful treats freeze beautifully for up to 2 months. Place them in a single layer on a baking sheet before transferring to an airtight container.
Thawing: To enjoy, simply thaw the frozen cheesecake balls in the refrigerator for a few hours before serving, preserving their creamy texture.
Keep Covered: Always store the balls in a covered container to prevent them from absorbing odors or drying out while in the fridge or freezer.
No Bake Pumpkin Cheesecake Balls Variations
Feel free to play around with these ideas and make this recipe your own—your taste buds will thank you!
-
Ginger Snap Swap: Mix gingersnap crumbs instead of graham crackers for a spicier twist that complements the pumpkin beautifully.
The added warmth from ginger elevates each bite, making your pumpkin-themed gathering extra special. -
Dairy-Free Delight: Substitute the cream cheese with a dairy-free alternative, like cashew cream or vegan cream cheese, for a creamy, plant-based version.
These swaps keep the dish rich and delicious without dairy, allowing everyone to enjoy the treat. -
Nutty Goodness: Add finely chopped nuts, like pecans or walnuts, into the filling for delightful crunch and added flavor.
This provides contrasting textures and makes each bite even more satisfying! -
Chocolate Lovers: Use white chocolate or dark chocolate for the coating, or experiment with a mix of both for a beautiful, layered look.
A touch of flavored chocolate gives these balls a unique and indulgent flair. -
Pumpkin Spice Bliss: Enhance the flavor with an extra sprinkle of pumpkin pie spice in the mixture to really emphasize that fall essence.
The more spice, the merrier—especially when these are paired with warm drinks like Maple Pumpkin Coffee. -
Sugar-Free Version: If you’re watching your sugar intake, use a sugar-free powdered sugar alternative to sweeten your filling while maintaining sweetness.
This way, you can satisfy your sweet cravings without guilt! -
Flavorful Finish: Drizzle caramel or chocolate sauce over the coated balls for an extra layer of sweetness and visual appeal.
It turns a simple treat into a showstopper at any gathering—one that friends and family will admire long before they dig in!
Each variation offers a little twist that can transform these No Bake Pumpkin Cheesecake Balls into something uniquely special just for you and your guests!
Expert Tips for No Bake Pumpkin Cheesecake Balls
Chill Out: Allow your pumpkin mixture to chill before rolling. This prevents stickiness and helps the No Bake Pumpkin Cheesecake Balls hold their shape during dipping.
Measure Wisely: Use a tablespoon scoop for uniform balls. This ensures even coating and baking time—perfect for presentation and bite size.
Quality Matters: Opt for full-fat cream cheese for the richest flavor, and steer clear of tub-style cream cheese to maintain the right texture in your No Bake Pumpkin Cheesecake Balls.
Garnish Delight: Get creative with your garnishes! Use different sprinkles or crushed nuts to provide a festive touch that enhances both taste and visual appeal.
Storage Tips: Keep undipped balls in the fridge for up to 2-3 days. If you’ve dipped them, they last 4-5 days—perfect for prepared holiday snacks!

No Bake Pumpkin Cheesecake Balls Recipe FAQs
How do I choose ripe pumpkin purée?
Absolutely! When selecting pumpkin purée, look for 100% pure pumpkin listed on the label, which is available in cans at most grocery stores. Avoid pie filling, as it’s often mixed with sugars and spices that can alter your recipe. If you’re using fresh pumpkin, choose one that feels heavy for its size, with a firm skin and deep color.
What’s the best way to store leftover cheesecake balls?
Very simply! If they’re undipped, store your No Bake Pumpkin Cheesecake Balls in an airtight container in the refrigerator for up to 2-3 days. If you’ve already dipped them in chocolate, they can last around 4-5 days. Make sure to keep them covered to maintain their freshness!
Can I freeze these pumpkin cheesecake balls?
Absolutely! To freeze your No Bake Pumpkin Cheesecake Balls, place them in a single layer on a baking sheet and pop them in the freezer for about 1-2 hours until firm. Once set, transfer them to an airtight container or a freezer-safe bag, separating layers with parchment paper. They’ll keep well for about 2 months. To thaw, simply move them to the refrigerator for a couple of hours before serving.
What if my mixture is too sticky to form balls?
No worries! If your mixture is too sticky, try chilling it a bit longer in the fridge—about 10-15 additional minutes should help it firm up. Alternatively, you can dust your hands with powdered sugar or use a bit of graham cracker crumbs to help with shaping the balls. The more the merrier when it comes to tweaking the mixture for the perfect consistency!
Are these No Bake Pumpkin Cheesecake Balls suitable for gluten-free diets?
Yes, indeed! To make these cheesecake balls gluten-free, simply replace the graham cracker or gingersnap crumbs with gluten-free options. Ensure that all other ingredients, especially the chocolate coating, are certified gluten-free. This way, everyone can enjoy these delightful treats!
How can I make sure my coated balls have a nice shine?
To achieve that tempting glossy sheen, make sure your chocolate is melted smoothly and thinned with a teaspoon of coconut oil. After dipping, allow them to rest at room temperature for the coating to set properly. It enhances both the appearance and texture of your No Bake Pumpkin Cheesecake Balls.
Delicious No Bake Pumpkin Cheesecake Balls for Easy Fall Treats
Ingredients
Equipment
Method
- Start by blotting the pumpkin purée with paper towels for about 5 minutes to remove excess moisture.
- In a large mixing bowl, beat the cream cheese until smooth and creamy, then gradually add the pumpkin purée and other ingredients.
- Fold in the cookie crumbs gently until combined, then chill the mixture for 15-20 minutes.
- Roll the mixture into small balls and place on a parchment-lined sheet pan.
- Melt your choice of chocolate and dip each ball, tapping off excess coating.
- Garnish with crushed cookies or sprinkles immediately after coating.
- Let the garnished balls sit for 10-15 minutes to allow the coating to set before serving.
Leave a Reply