
The kitchen is filled with the sweet fragrance of honey, reminding me of warm afternoons spent baking with loved ones. Today, I’m excited to share my go-to dessert: Easy Salted Honey Pie. This delightful creation marries smooth, rich honey with a sprinkle of sea salt, creating a perfect harmony of sweet and salty flavors. Not only is it a quick dessert that you can whip up in just 10 minutes, but it also impresses at dinner parties and family gatherings alike. Plus, for those following a gluten-free diet, you can easily adapt this recipe to meet your needs! Are you ready to dive into baking happiness and make a pie that will leave everyone wanting more?
Why is Salted Honey Pie So Special?
Quick and Easy: This recipe requires only 10 minutes of hands-on time, making it a breeze for anyone, even on busy days.
Unique Flavor Combo: The fusion of sweet honey and savory sea salt creates an irresistible taste that surprises and delights your palate.
Adaptable to Dietary Needs: Easily swap in gluten-free crusts or dairy-free options to accommodate various dietary preferences, ensuring everyone can enjoy it.
Crowd-Pleasing Treat: Perfect for any occasion, whether a casual family dinner or an elegant gathering, this pie is sure to impress. For another delicious dessert option, check out my recipe for Apple Cider Whoopie cookies, which also make for a delightful sweet ending!
Satisfy Your Sweet Tooth: Serve it plain, or elevate the experience with a scoop of vanilla ice cream for an added indulgent touch!
Salted Honey Pie Ingredients
For the Crust
• Pie Crust – Opt for a store-bought version for ease or make your own for that homemade touch; choose a gluten-free variety for a diet-friendly option.
For the Filling
• Honey – Use high-quality honey for the best flavor; maple syrup or agave can substitute, but they will alter the taste of your Salted Honey Pie.
• Heavy Cream – Adds richness to the filling; consider using whole milk or coconut cream as lighter alternatives if desired.
• Unsalted Butter – Enhances the overall flavor of the pie; feel free to swap it with coconut oil or vegan butter for a dairy-free version.
• Eggs – These provide essential structure to the creamy filling.
• Flaky Sea Salt – A sprinkle just before serving elevates the pie’s flavor profile beautifully.
Step‑by‑Step Instructions for Salted Honey Pie
Step 1: Preheat the Oven
Begin your Salted Honey Pie adventure by preheating your oven to 350°F (175°C). This crucial first step ensures that your pie cooks evenly and achieves that perfect golden hue. While the oven heats up, gather your ingredients and equipment, including a mixing bowl and a whisk, to make the upcoming steps seamless.
Step 2: Prepare the Crust
Next, take your pie crust and roll it out if you’re making your own; if using store-bought, simply place it directly into a 9-inch pie plate. Be sure to crimp the edges for a beautiful finish. This crust will serve as the delightful base for your rich filling, so make sure it fits snugly into the dish.
Step 3: Make the Filling
In a medium bowl, combine the eggs, honey, heavy cream, melted unsalted butter, a pinch of salt, and vanilla extract. Whisk all these ingredients together until the mixture is smooth and well-blended. This delicious filling is what makes your Salted Honey Pie so incredibly flavorful, so take a moment to enjoy the sweet aroma.
Step 4: Fill the Crust
Carefully pour the honey filling into your prepared crust, ensuring not to overfill it. Leave a little space at the top to prevent any spillage as it bakes. The filling should spread evenly across the crust, creating a lovely layer that will set beautifully during the baking process.
Step 5: Bake
Slide your pie into the preheated oven and bake for 35-40 minutes. You’ll know it’s done when the edges are slightly puffed, and the center has a gentle jiggle. This is the sweet spot for the filling: set but still creamy, making for a melt-in-your-mouth experience with every bite.
Step 6: Cool
Once baked, remove the Salted Honey Pie from the oven and let it cool to room temperature on a wire rack. This cooling period allows the flavors to meld together beautifully. After it has cooled, transfer the pie to the refrigerator and chill it for at least 2 hours to set up the filling even more.
Step 7: Serve
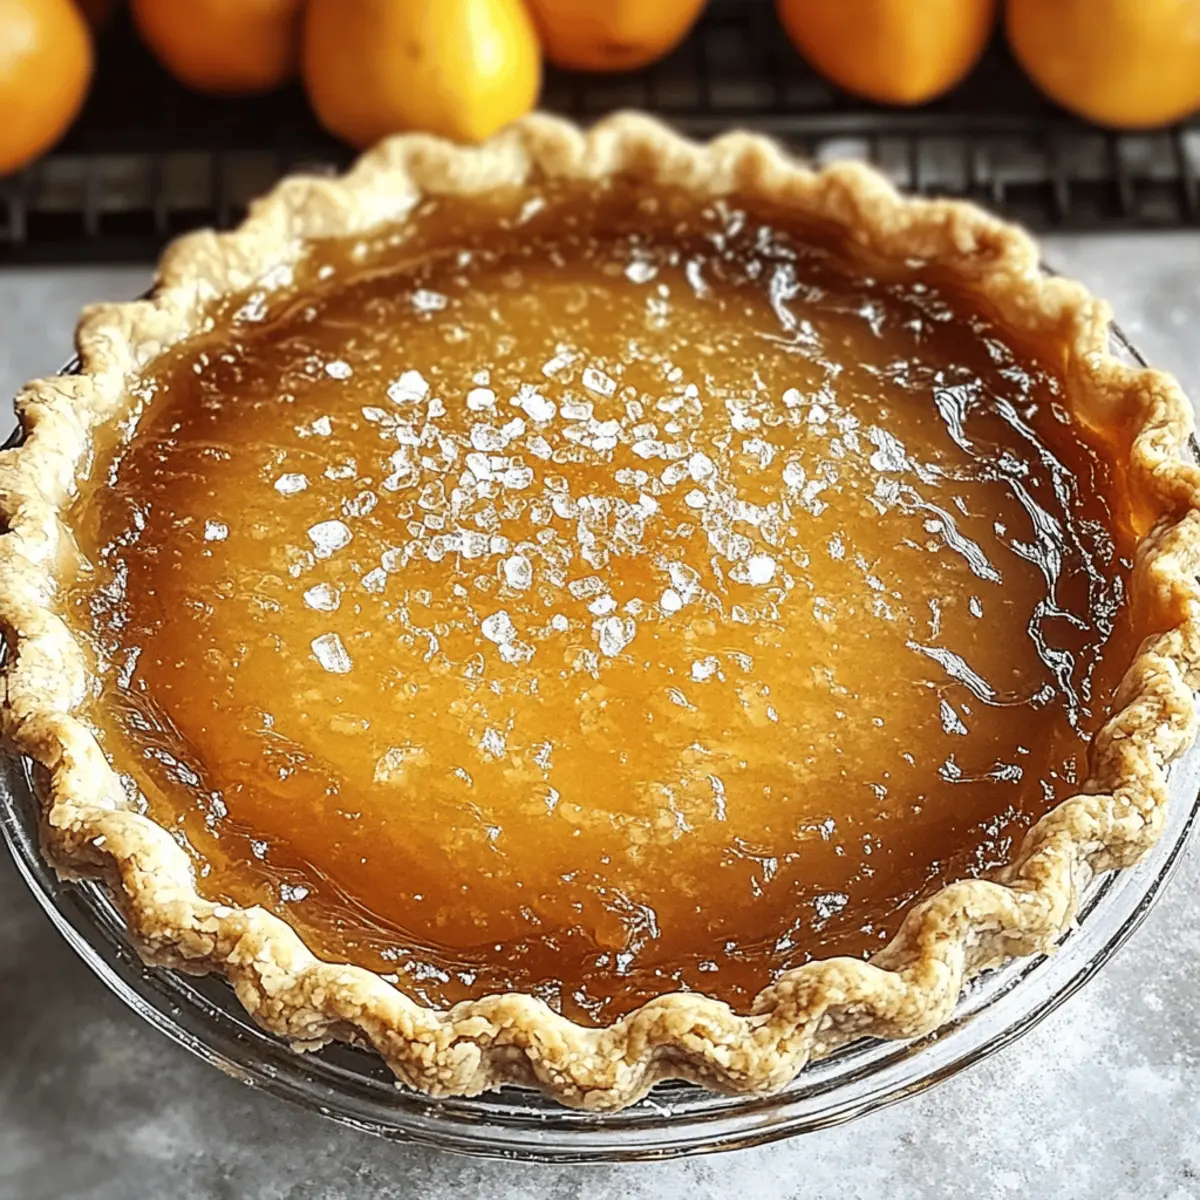
When you’re ready to serve your Salted Honey Pie, take it out of the fridge and sprinkle a touch of flaky sea salt over the top. This sprinkle enhances the flavors, adding an appetizing visual contrast. Slice the pie with a sharp knife, and prepare to savor the delightful balance of sweet and salty goodness in each bite!

Salted Honey Pie Variations & Substitutions
Feel free to get creative with your Salted Honey Pie by trying out these fun and tasty adjustments!
-
Gluten-Free: Use a gluten-free store-bought crust or a homemade graham cracker crust to keep it friendly for gluten-sensitive guests. They’ll love your thoughtful adaptation!
-
Dairy-Free: Swap heavy cream with coconut cream and butter with coconut oil to make this pie dairy-free. The subtle coconut flavor brings a tropical twist too!
-
Swap Sweeteners: Replace honey with maple syrup or agave syrup for a different sweetening experience, but keep in mind it will alter the pie’s signature flavor.
-
Flavor Boost: Add a splash of vanilla or your favorite flavored extract such as almond or bourbon to the filling for an interesting depth of flavor. Imagine that aroma filling your kitchen!
-
Texture Twist: Experiment with a chocolate cookie crust for a sweetly indulgent surprise. The chocolatey richness pairs perfectly with the creamy filling, making each bite decadent.
-
Nutty Addition: Stir in finely chopped nuts, such as walnuts or pecans, into the filling for a delightful crunch in contrast to the smooth creaminess. It’s a texture explosion!
-
Add Spice: Consider a pinch of cinnamon or nutmeg in the filling for warmth and coziness. Your pie will evoke all those homey scents we associate with sweet treats.
-
Extra Salty: For salt lovers, don’t hesitate to increase the amount of flaky sea salt on top right before serving. It will heighten the sweet-and-salty contrast, making every bite irresistible!
These options can elevate your Salted Honey Pie experience, tailoring it to your taste buds and dietary needs! If you want more delicious desserts, don’t forget to check out my recipes for Honey Walnut Shrimp or Lobster Pot Pie for amazing flavors!
Storage Tips for Salted Honey Pie
- Fridge: Store leftover Salted Honey Pie in an airtight container for up to 3-4 days. Chilling keeps it fresh and enjoyable, ready to satisfy your sweet cravings anytime.
- Freezer: You can freeze your pie for up to 3 months. Wrap it tightly in plastic wrap and then in aluminum foil to prevent freezer burn. Thaw in the fridge before serving.
- Reheating: If you prefer it warm, reheat individual slices in the microwave for 15-20 seconds or in an oven set to 350°F (175°C) for 10-15 minutes for that freshly baked flavor.
Make Ahead Options
These Easy Salted Honey Pies are a fantastic choice for meal prep! You can prepare the filling up to 24 hours in advance by mixing the eggs, honey, heavy cream, melted butter, and salt, then refrigerating it in an airtight container to keep everything fresh. The pie crust can also be rolled out and placed in the pie plate up to 1 day ahead. Just remember to cover it with plastic wrap to prevent drying out. When you’re ready to enjoy your pie, simply pour the chilled filling into the crust, bake as directed, and sprinkle the flaky sea salt just before serving for that delicious finish. Prepare ahead and savor the time saved during busy weeknights!
What to Serve with Easy Salted Honey Pie
Imagine the sweet end to a lovely meal, where every bite of pie melts in your mouth and leaves everyone smiling.
-
Whipped Cream: A dollop of freshly whipped cream adds a light, airy contrast to the creamy filling, enhancing its indulgence.
-
Vanilla Ice Cream: This classic pairing brings a cool creaminess that complements the warm notes of honey; it’s truly a match made in dessert heaven.
-
Fresh Berries: A side of tart berries, like raspberries or blueberries, provides a burst of freshness that balances the pie’s sweetness.
-
Homemade Caramel Sauce: Drizzling warm caramel over each slice adds extra sweetness and richness, elevating the pie experience.
-
Espresso or Coffee: A cup of rich espresso or coffee serves as a robust counterpoint to the sweet and salty flavors of the pie, creating a perfect ending to the meal.
-
Nuts: Roasted almonds or pecans can add a delightful crunch, enhancing the texture and flavor profile of your delightful pie.
-
Chocolate Sauce: For chocolate lovers, a drizzle of chocolate sauce creates a richly decadent combination that’s hard to resist.
-
Cheese Platter: Adding a cheese platter with mild, creamy cheeses can bring a savory contrast to the pie’s sweet notes for a more complex finish.
-
Mint Tea: A refreshing mint tea serves as a palate cleanser that complements the honey flavor beautifully, leaving everyone refreshed.
-
Fruit Salad: A light, citrusy fruit salad can be a refreshing, healthful accompaniment that balances the richness of the pie.
Expert Tips for Salted Honey Pie
- Smooth Filling: Ensure your filling is thoroughly whisked to avoid any lumps, creating a creamy texture in your Salted Honey Pie.
- Avoid Overfilling: Leave space at the top of your crust to prevent spillage during baking, which could make a mess and ruin presentation.
- Chill Properly: Don’t skip the chilling step after baking; letting it cool for at least 2 hours helps the pie set perfectly, enhancing the flavor and texture.
- Check Doneness: Look for a slight jiggle in the center when baking; it’s a sign the filling is set but still creamy, which is essential for that melt-in-your-mouth experience.
- Finishing Touch: Adding flaky sea salt just before serving not only looks great but elevates the sweet and salty flavor profile, making each slice a delight!

Salted Honey Pie Recipe FAQs
What kind of honey should I use for the Salted Honey Pie?
Absolutely! For the best flavor, opt for high-quality, raw honey. It gives your pie a rich sweetness that really shines through. If you’re looking for alternatives, you can use maple syrup or agave syrup, but they will change the overall profile of your Salted Honey Pie, so keep that in mind.
How should I store leftover Salted Honey Pie?
You can keep your pie fresh by storing it in an airtight container in the fridge for up to 3-4 days. Just make sure it’s covered to avoid any absorption of odors. If you want to savor it later, you can freeze it for up to 3 months; be sure to wrap it tightly in plastic wrap followed by aluminum foil to prevent freezer burn.
Can I make this pie gluten-free?
Very! To create a gluten-free Salted Honey Pie, simply use a gluten-free pie crust or a graham cracker crust. There are many store-bought options available that taste fantastic. This way, everyone can indulge in this delicious dessert without any worries!
What should I do if the filling looks lumpy?
If your filling appears lumpy, don’t fret! Make sure to whisk the eggs and honey mixture thoroughly until it’s completely smooth before pouring into the crust. If you’ve already poured it in, a quick solution is to strain the filling through a fine mesh sieve before baking. This extra step will ensure a creamy, delightful texture you’re dreaming of.
How do I freeze my Salted Honey Pie properly?
To freeze your Salted Honey Pie, let it cool completely first. Wrap the entire pie in plastic wrap securely, then cover it with aluminum foil to lock in freshness. Make sure to label the package with the date. When you’re ready to enjoy, just move it to the fridge to thaw overnight. After thawing, if you prefer warm pie, reheat slices in the microwave for 15-20 seconds or in an oven at 350°F (175°C) for 10-15 minutes. That’s perfect for getting that delightful, freshly-baked texture back!

Irresistible Salted Honey Pie for Quick Sweet Bliss
Ingredients
Equipment
Method
- Preheat your oven to 350°F (175°C). Gather your ingredients and equipment.
- Roll out your pie crust and place it in a 9-inch pie plate. Crimp the edges.
- In a medium bowl, whisk together the eggs, honey, heavy cream, melted unsalted butter, a pinch of salt, and vanilla extract until smooth.
- Pour the honey filling into your prepared crust and leave some space at the top.
- Bake for 35-40 minutes until the edges are slightly puffed and the center has a gentle jiggle.
- Let the pie cool to room temperature on a wire rack, then chill in the refrigerator for at least 2 hours.
- Before serving, sprinkle flaky sea salt over the top and slice the pie.
Leave a Reply