
As I took my first bite of the Crispy Chicken Caesar Sandwich, I was instantly transported to a bustling café on a warm afternoon, where the sun casts a golden glow on freshly baked baguettes and the tantalizing aroma of fried chicken fills the air. This scrumptious creation is a perfect marriage of classic Caesar salad flavors and juicy, golden-fried chicken that you can whip up for lunch, dinner, or even game day gatherings. With quick prep and customizable options, it caters to both your comfort food cravings and your busy lifestyle. Imagine walking in after a long day and treating yourself to a sandwich that elevates a simple meal to something enjoyable and festive. How can you resist giving it a try?
Why is this sandwich a must-try?
Irresistible flavors: The Crispy Chicken Caesar Sandwich combines juicy fried chicken with the zesty creaminess of homemade Caesar dressing, creating a taste sensation you won’t want to miss.
Quick preparation: With straightforward steps and minimal ingredients, you can whip up this delightful meal in no time, perfect for busy weeknights.
Customizable options: Feel free to switch out chicken for grilled portobello mushrooms or use gluten-free flour to cater to dietary needs—this sandwich is as versatile as it is delicious!
Crowd-pleaser: Whether for a casual lunch or a game-day feast, it’s sure to impress family and friends—just cut into smaller portions for a fun party platter!
If you’re looking for other options, try my flavorful Chicken Caesar Sandwich that keeps things classic, or explore Cheesy Garlic Chicken for a tasty twist!
Crispy Chicken Caesar Sandwich Ingredients
For the Chicken
- Chicken Cutlets – Provide protein and a satisfying crunch; boneless, skinless breasts work best.
- Flour – Creates a base coating; substitute with gluten-free flour for a gluten-free option.
- Eggs – Bind the breadcrumbs for a crispy exterior; consider vegan egg replacement if desired.
- Panko Breadcrumbs – Ensure the crust is super crispy; use regular breadcrumbs for a softer texture.
- Parmesan Cheese – Adds a rich umami flavor; swap with nutritional yeast for a vegan version.
For the Salad
- Romaine Lettuce – Offers freshness and crunch; any leafy green works, though romaine captures that classic Caesar vibe.
- Mayonnaise – Forms the base of the creamy dressing; vegan mayo can be used for a plant-based option.
- Greek Yogurt – Adds creaminess; can be substituted with sour cream or a dairy-free yogurt.
- Dijon Mustard – Provides a tangy kick; use yellow mustard in a pinch.
- Worcestershire Sauce – Adds depth; vegan versions are available if needed.
- Lemon Juice – Brightens flavors; fresh is best, but bottled can work in a hurry.
- Garlic – Infuses the dressing with flavor; fresh garlic is ideal, but powder can be a quick alternative.
- Black Pepper – Enhances overall flavor; adjust according to taste preferences.
For Assembly
- Baguette – Holds the delicious fillings; any sturdy bread will do, like ciabatta or a whole-grain roll.
Get ready to create your Crispy Chicken Caesar Sandwich with these delightful ingredients that bring comfort and joy!
Step‑by‑Step Instructions for Crispy Chicken Caesar Sandwich
Step 1: Prepare the Dressing
In a mixing bowl, combine mayonnaise, Greek yogurt, Dijon mustard, Worcestershire sauce, lemon juice, minced garlic, black pepper, and salt. Whisk everything together until you achieve a smooth and creamy consistency. Reserve a small portion of this delicious dressing for drizzling over the romaine later. Set the bowl aside while you move on to the next steps of making the Crispy Chicken Caesar Sandwich.
Step 2: Prep the Chicken
Begin by pounding the chicken cutlets to an even thickness of about half an inch. This ensures they cook evenly and remain juicy. After flattening, season both sides generously with salt and black pepper to enhance the flavor. Make sure the chicken is dry to help the breading stick better when we coat the cutlets next.
Step 3: Set Up Your Breading Station
Prepare three separate shallow dishes: one for the flour mixed with a pinch of paprika for flavor, one for the whisked eggs, and another for a crunchy mixture of panko breadcrumbs, chopped parsley, garlic powder, and grated Parmesan cheese. This setup will make breading your chicken cutlets a smooth process, making sure each piece gets that delightful crispy texture in your Crispy Chicken Caesar Sandwich.
Step 4: Bread the Chicken
Starting with a chicken cutlet, dredge it into the flour mixture, shaking off any excess. Next, dip it into the whisked eggs, ensuring it’s well coated. Finally, press the cutlet into the panko mixture, covering it completely for the maximum crunch. Set the breaded chicken aside on a wire rack until you’re ready to fry it, allowing the coating to adhere well.
Step 5: Fry the Chicken
In a large skillet, heat about half an inch of oil over medium-high heat until it shimmers, around 350°F (175°C). Carefully place the breaded chicken cutlets into the hot oil, frying them for about 4-5 minutes on each side until they turn golden brown and crispy. Use a thermometer or your eyes—when they have a beautiful color and hear that sizzling sound, they’re ready! Once fried, transfer them to a wire rack to drain any excess oil.
Step 6: Assemble the Sandwich
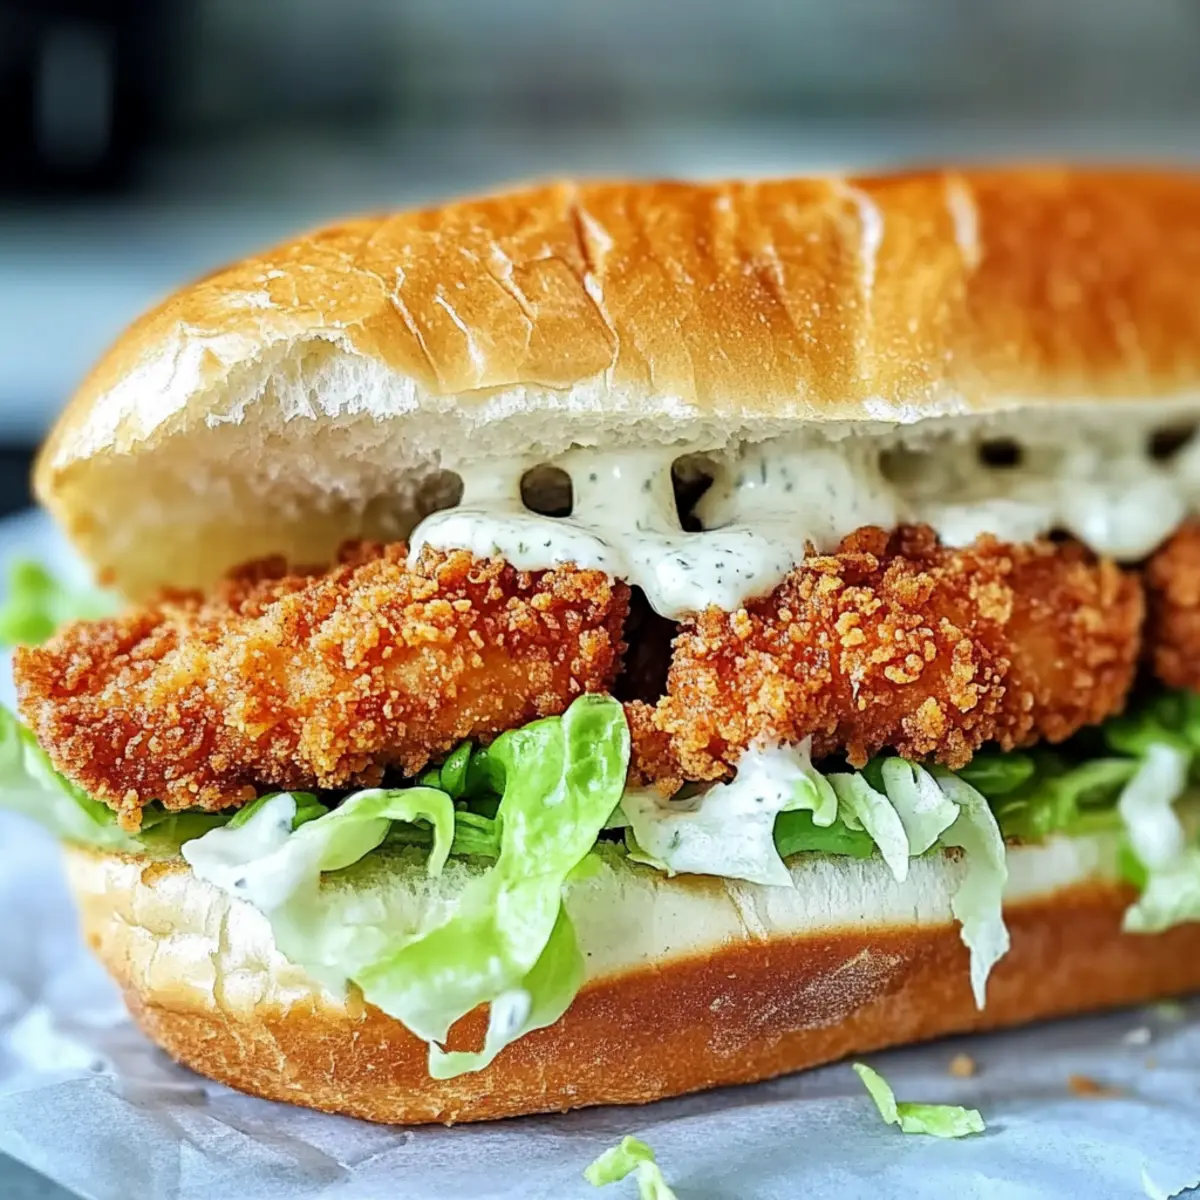
Take a fresh baguette and slice it in half, creating a pocket for your filling. Generously spread the homemade Caesar dressing inside the baguette to enhance the flavors. Place a crispy chicken cutlet in the center, then top it with fresh, dressed romaine lettuce and a sprinkle of extra grated Parmesan cheese. This final assembly step transforms your ingredients into a delightful Crispy Chicken Caesar Sandwich that’s packed with flavor.

How to Store and Freeze Crispy Chicken Caesar Sandwich
Fridge: Keep leftover Crispy Chicken Caesar Sandwiches in an airtight container for up to 3 days. Store salad and dressing separately to avoid sogginess.
Freezer: For best results, freeze breaded chicken cutlets individually, wrapped tightly in plastic and then in foil, for up to 2 months.
Reheating: When ready to enjoy, reheat the frozen chicken cutlets in the oven at 375°F (190°C) for about 15-20 minutes or until heated through for a crispy texture.
Assembly Reminder: Assemble your sandwich fresh, adding dressed romaine just before serving to maintain that delightful crunch!
What to Serve with Crispy Chicken Caesar Sandwich
Elevate your mealtime with delightful sides that balance flavors and textures, enhancing your sandwich experience.
-
Golden French Fries: Crispy and salty, fries add a delightful crunch that complements the sandwich’s textures, making every bite a treat.
-
Fresh Fruit Salad: A medley of seasonal fruits provides a refreshing contrast to the savory sandwich, offering a burst of natural sweetness.
-
Roasted Potato Wedges: Seasoned and golden, these wedges are comforting and hearty, perfectly pairing with the lightness of the Caesar flavors.
-
Coleslaw: Crunchy and creamy, coleslaw adds a refreshing element, cutting through the richness of the sandwich and offering a crisp bite.
-
Steamed Broccoli: With its vibrant green color and slight crunch, steamed broccoli provides a nutritious side that complements the meal without overshadowing it.
-
Garlic Bread: Cheesy and buttery, this garlic-infused delight pairs beautifully, allowing you to savor an extra layer of flavor with each mouthful.
-
Iced Tea or Lemonade: A cool, refreshing drink can balance the richness of the sandwich, such as lemon-infused iced tea or a classic glass of lemonade.
Explore these pairings to find your perfect match with the Crispy Chicken Caesar Sandwich and create a meal that’s not just satisfying but truly memorable!
Crispy Chicken Caesar Sandwich Variations
Feel free to explore these delicious twists to customize your Crispy Chicken Caesar Sandwich and make it uniquely yours!
-
Vegetarian: Swap the fried chicken with crispy breaded tofu or grilled portobello mushrooms for a satisfying meat-free option. Both alternatives offer a delightful texture that complements the Caesar dressing beautifully.
-
Gluten-Free: Use gluten-free flour for the breading and pair with a gluten-free baguette, ensuring you don’t miss out on any of the classic flavors. This adaptation makes it accessible for those with gluten sensitivities without sacrificing taste!
-
Low-Calorie: For a lighter bite, try using grilled chicken breast or baked chicken cutlets. It’s a great way to enjoy this sandwich without the extra calories from frying, keeping it both delicious and guilt-free.
-
Different Greens: Instead of romaine lettuce, experiment with arugula, spinach, or kale for an exciting flavor and texture change. Each leafy green brings its unique bite, providing an interesting spin that freshens up the traditional taste.
-
Heat it Up: For a spicy kick, add sliced jalapeños or a drizzle of hot sauce directly onto the sandwich. This fiery addition enhances the overall flavor, making it even more captivating each bite!
-
Creative Bread: Instead of a baguette, use ciabatta rolls, whole-grain bread, or even pita pockets. Each option adds character and new flavors to your sandwich, offering something exciting every time!
-
Meal Prep: Make extra chicken cutlets ahead of time to use in salads or wraps during the week. This versatile ingredient can go beyond the sandwich, making meal planning easier and delightful!
Ready to dive into the crispy, creamy goodness? Enjoy the classic appeal or branch out with these tempting variations! If you’re in the mood for more chicken goodness, check out my savory French Onion Chicken Rice Bake or the delicious Garlic Butter Chicken and Rice Casserole—both stunning options to liven up your dinner routine!
Expert Tips for the Best Crispy Chicken Caesar Sandwich
-
Uniform Thickness: Ensure chicken cutlets are pounded to an even thickness; this guarantees consistent cooking and prevents dry spots.
-
Dry Chicken: Before dredging, make sure your chicken is thoroughly dried. Moisture can prevent the breading from adhering properly, leading to soggy bites.
-
Maintain Oil Temperature: Fry the chicken in batches for optimal heat retention. This ensures a beautifully crispy texture in your Crispy Chicken Caesar Sandwich without overcooking.
-
Dressing Timing: Dress the romaine just before assembling the sandwich. This keeps the lettuce crisp and fresh, adding a refreshing crunch to each bite.
-
Experiment with Bread: Don’t hesitate to try different types of bread, like ciabatta or whole-grain rolls, to discover your favorite flavor combinations with the crispy chicken.
-
Make-Ahead Tip: You can prepare the chicken in advance and refrigerate or freeze it. Just reheat in the oven for a quick, delicious meal later!
Make Ahead Options
These Crispy Chicken Caesar Sandwiches are perfect for busy home cooks looking to save time during the week! You can prepare the homemade Caesar dressing and breaded chicken cutlets up to 24 hours in advance; simply refrigerate them in airtight containers to maintain freshness. Additionally, pre-chop the romaine lettuce and keep it separate to prevent wilting. On the day you plan to enjoy these delicious sandwiches, just fry the breaded chicken until golden and crispy, assemble with the lettuce and dressing, and you’ll have a quick meal that tastes just as delightful as if made fresh! No need to compromise on quality when you prepare ahead—this way, you can enjoy a comforting meal with minimal effort after a long day.

Crispy Chicken Caesar Sandwich Recipe FAQs
What type of chicken should I use for the Crispy Chicken Caesar Sandwich?
Absolutely! For the best results, boneless, skinless chicken breasts are ideal. They cook quickly and stay juicy, making your sandwich not only easier to prepare but incredibly tasty.
How should I store leftover sandwiches?
Leftover Crispy Chicken Caesar Sandwiches should be kept in an airtight container in the refrigerator for up to 3 days. To maintain quality, it’s best to store the salad and additional dressing separately from the sandwich to prevent sogginess.
Can I freeze the breaded chicken?
Very! For optimal results, you can freeze the breaded chicken cutlets individually. Wrap them tightly in plastic wrap, followed by foil, and they can stay in the freezer for up to 2 months. When you’re ready to enjoy, reheat them in the oven at 375°F (190°C) for about 15-20 minutes until heated through.
What should I do if my breading isn’t sticking well?
If you find that your breading isn’t adhering well, ensure the chicken cutlets are thoroughly dried before you begin the dredging process. Moisture can prevent the coating from sticking properly. A tip I often use is to press the breadcrumbs down firmly on the chicken during the coating step to achieve a better hold.
Can this recipe be made allergy-friendly?
Absolutely! To cater to various dietary needs, you can substitute gluten-free flour for regular flour, use a vegan egg replacement, and opt for dairy-free yogurt and vegan mayo in the dressing. This makes the Crispy Chicken Caesar Sandwich versatile for different preferences.
How do I prevent the lettuce from getting soggy?
To keep the lettuce crisp and fresh, dress the romaine just before assembling each sandwich. This way, it remains crunchy and adds that delightful freshness to your Crispy Chicken Caesar Sandwich for every bite!

Crispy Chicken Caesar Sandwich: Your Go-To Comfort Bite
Ingredients
Equipment
Method
- In a mixing bowl, combine mayonnaise, Greek yogurt, Dijon mustard, Worcestershire sauce, lemon juice, minced garlic, black pepper, and salt. Whisk until smooth. Reserve some dressing for drizzling later.
- Pound the chicken cutlets to an even thickness of about half an inch. Season with salt and black pepper.
- Prepare three shallow dishes: one with flour mixed with paprika, one with whisked eggs, and one with panko breadcrumbs mixed with parsley, garlic powder, and grated Parmesan cheese.
- Dredge each chicken cutlet in the flour, dip in eggs, then coat in the panko mixture. Set aside on a wire rack.
- Heat oil in a skillet over medium-high heat. Fry chicken cutlets for 4-5 minutes per side until golden brown. Drain on a wire rack.
- Slice the baguette in half, spread dressing inside, add a chicken cutlet, top with dressed romaine, and sprinkle with Parmesan cheese.
Leave a Reply