
The sound of sizzling chicken fills the kitchen as I prepare to build something truly special: a Crispy Chicken Caesar Sandwich with Homemade Dressing. This delightful creation takes all the classic flavors of a Caesar salad and wraps them in a delicious sandwich format, making it perfect for those of us who crave both convenience and rich taste. With crunchy golden-fried chicken, crisp romaine lettuce, and a creamy dressing that you can whip up in no time, this recipe not only satisfies hunger but also elevates your lunch or dinner game. Plus, it’s a surefire crowd-pleaser that makes for a wholesome meal without the fuss of takeout! Curious about how to assemble this mouthwatering delight? Let’s dive into the details!
What Makes This Sandwich Irresistible?
Crisp Perfection: The golden-fried chicken seasoned just right creates an irresistible crunch that’ll have you reaching for seconds.
Homemade Goodness: Our creamy Caesar dressing is easy to whip up and bursting with flavor, making it a standout from store-bought options.
Versatile Delight: Whether for lunch or dinner, this sandwich is perfect for any occasion and pairs wonderfully with sides like french fries or a refreshing cucumber salad.
Quick Assembly: Once your ingredients are prepped, you can put this meal together in no time, making it ideal for busy weeknights.
Crowd-Pleaser: From kids to adults, everyone loves a good sandwich, and this crispy take on a classic Caesar will win over even the pickiest eaters!
Crispy Chicken Caesar Sandwich Ingredients
• To create the perfect Crispy Chicken Caesar Sandwich, you’ll need a delightful mix of ingredients to ensure bold flavors and satisfying textures.
For the Caesar Dressing
- Full-Fat Mayonnaise – Provides a rich creaminess that makes the dressing luscious.
- Greek Yogurt – Adds tanginess; you can substitute with sour cream for an extra zing.
- Dijon Mustard – Infuses a subtle kick that complements the dressing beautifully.
- Worcestershire Sauce – Gives depth and umami flavor to the dressing.
- Lemon Juice – Brightens the dressing and balances the richness.
- Parmesan Cheese – Enhances the savory notes; opt for freshly grated for best results.
- Garlic – A must-have for that classic Caesar flavor.
- Black Pepper – Adds a touch of heat and spice.
- Sea Salt – Enhances all the flavors in the dressing.
For the Chicken
- Chicken Cutlets – The star of the sandwich; seasoned with salt and pepper for a kick of flavor.
- Oil for Frying – Use vegetable oil or canola oil for frying until crispy.
For Breading
- All-Purpose Flour – Dredging base that helps create a crunchy coating. Gluten-free flour works too!
- Smoked Paprika – Lends a smoky flavor; regular paprika is a fine alternative.
- Eggs – Binds the breadcrumbs to the chicken; you can use flax eggs as a vegan substitute.
- Panko and Breadcrumbs – Provides the crunch; substitute with crushed cornflakes for a gluten-free option.
- Dried Herbs (parsley, oregano) – Elevates flavor complexity; fresh herbs can enhance freshness.
For Assembly
- Romaine Hearts – Adds a fresh crunch to the sandwich. Spinach can be a tasty substitute.
- French Baguette – The hearty holder of your savory fillings; consider ciabatta or sourdough for a fun twist!
With these carefully chosen ingredients, your Crispy Chicken Caesar Sandwich will transform into a meal that both pleases the palate and nourishes the soul. Enjoy every bite!
Step‑by‑Step Instructions for Crispy Chicken Caesar Sandwich
Step 1: Prepare the Caesar Dressing
In a medium bowl, whisk together the full-fat mayonnaise, Greek yogurt, Dijon mustard, Worcestershire sauce, lemon juice, and freshly grated Parmesan cheese until smooth and creamy. Add minced garlic, black pepper, and sea salt to taste. Cover the bowl and refrigerate the dressing for at least 30 minutes to allow the flavors to meld beautifully, making your homemade dressing an absolute star of the Crispy Chicken Caesar Sandwich.
Step 2: Prepare the Chicken Cutlets
Start by placing the chicken cutlets between two sheets of plastic wrap. Using a meat mallet or rolling pin, pound the cutlets to an even thickness of about 1/2 inch. This ensures even cooking. Season both sides generously with salt and freshly cracked black pepper, enhancing the flavor of the chicken, which will become crispy and golden in your sandwich.
Step 3: Set Up the Breading Station
Gather three shallow plates to create your breading station. In the first plate, combine the all-purpose flour and smoked paprika. In the second plate, lightly beat the eggs. In the third plate, mix panko breadcrumbs with dried herbs. This organization will make the breading process for your Crispy Chicken Caesar Sandwich efficient and mess-free, ensuring each chicken cutlet receives a lovely coating.
Step 4: Bread the Chicken Cutlets
Take one seasoned chicken cutlet and dredge it in the flour mixture, making sure it’s evenly coated. Next, dip it into the beaten eggs, allowing any excess to drip off. Finally, coat the cutlet with the panko and breadcrumb mixture, pressing gently to ensure it adheres well. Repeat this for all cutlets, preparing them for frying with a delightful crunch to enhance your sandwich.
Step 5: Fry the Chicken Cutlets
In a large skillet, pour enough oil to cover the bottom and heat it over medium-high heat until it reaches around 350°F (175°C). Carefully place each breaded chicken cutlet in the hot oil, frying for about 4–5 minutes on each side until they turn a golden brown and crispy. Use tongs to remove the chicken and drain on a wire rack, preventing them from getting soggy before assembling the Crispy Chicken Caesar Sandwich.
Step 6: Assemble the Sandwiches
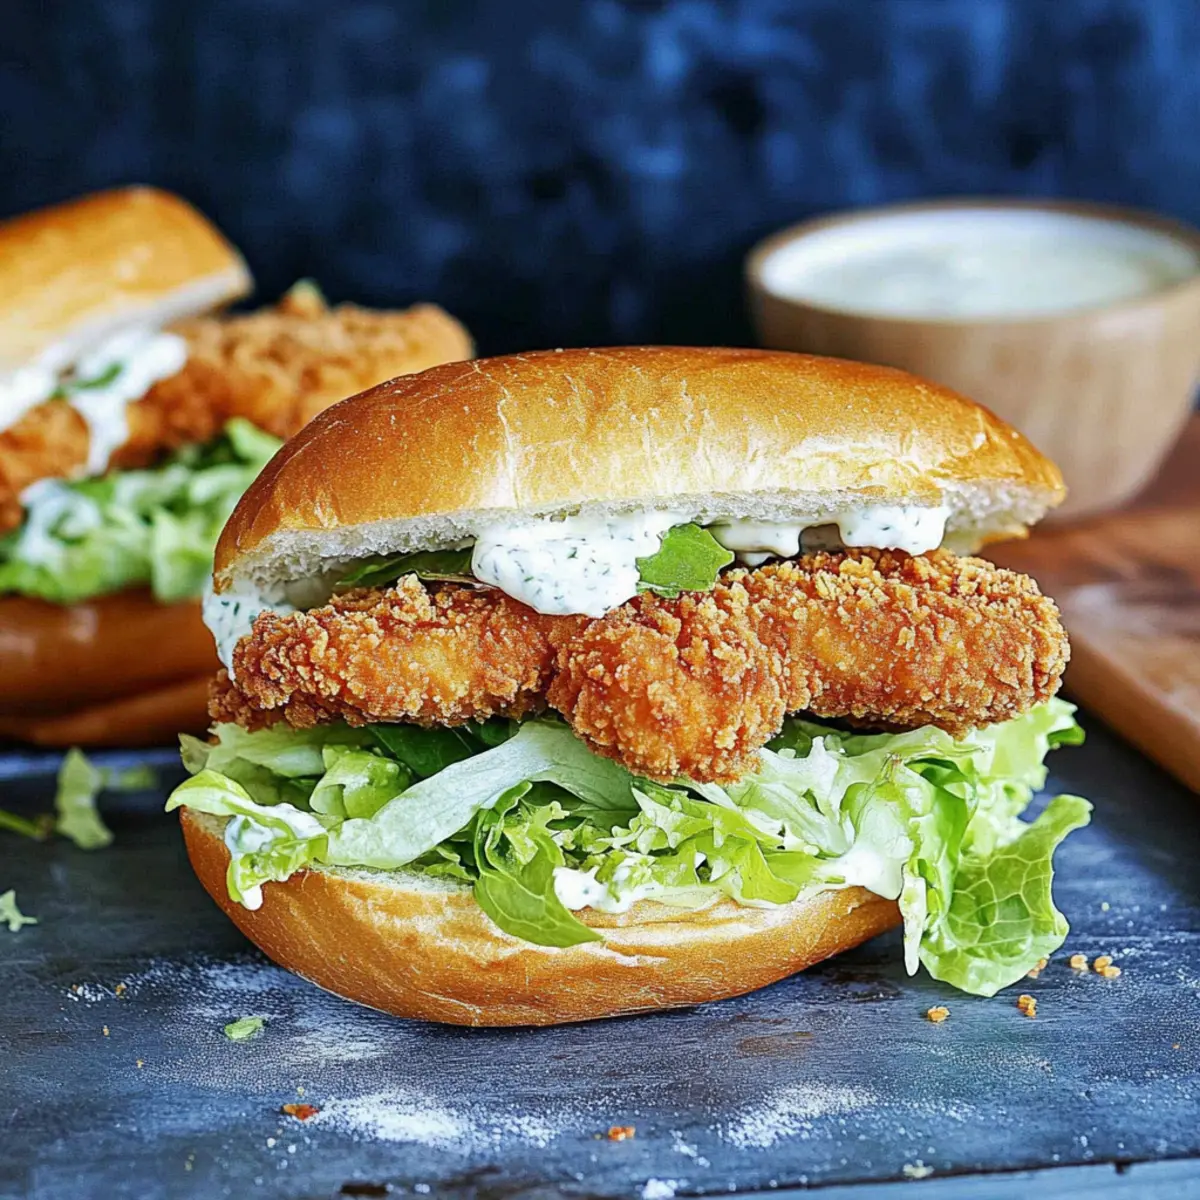
Slice the French baguette in half lengthwise, then spread a generous layer of your creamy homemade Caesar dressing on both sides. Place a fried chicken cutlet into the baguette and top it with fresh romaine hearts to add a satisfying crunch. Sprinkle with additional Parmesan cheese for an extra flavor boost, then close the sandwich. Serve immediately while the chicken is still warm and crispy for the best experience!

Make Ahead Options
These Crispy Chicken Caesar Sandwiches are a dream for meal prep! You can prepare the homemade Caesar dressing and refrigerate it for up to 3 days in advance. Additionally, you can bread the chicken cutlets a day ahead, keeping them well-covered in the fridge to maintain their crunchiness. When you’re ready to enjoy your sandwiches, simply cook the breaded chicken cutlets in hot oil as directed, and assemble your sandwiches with lettuce and dressing just before serving to ensure they stay fresh and crispy. This strategic prep not only saves you time but also allows you to indulge in this flavorful sandwich with less hassle during busy weeknights!
What to Serve with Crispy Chicken Caesar Sandwich
Pair your meal with delightful sides and drinks that accentuate the flavors of crispy goodness.
-
Crispy French Fries:
The classic side adds a satisfying crunch, balancing the crunchy chicken and creamy dressing perfectly. -
Herbed Potato Wedges:
Roasted with fragrant herbs, these wedges enhance the overall taste profile, bringing earthiness to the meal. -
Fresh Cucumber Salad:
Light and refreshing, this salad provides a cool contrast to the warm sandwich, making each bite feel invigorating. -
Garlic Bread:
Golden and buttery, garlic bread makes a delightful addition that complements the savory notes of the sandwich beautifully. -
Iced Tea:
A chilled glass of iced tea offers a refreshing thirst-quencher that complements the richness of the crispy chicken. -
Mojitos:
With their fresh mint and lime flavors, mojitos add a zesty and fun twist, perfect for a casual lunch or dinner. -
Fruit Sorbet:
As a light dessert, fruit sorbet cleanses the palate after the meal, wrapping up your dining experience with a sweet, fruity finish.
Expert Tips for the Best Chicken Caesar Sandwich
Crisp Chicken: Always ensure the oil is hot enough before frying to achieve the ultimate crispy chicken in your sandwich.
Mix in Advance: Prepare your homemade dressing ahead of time and let it chill; the flavors will deepen, enhancing your Chicken Caesar Sandwich.
Mind the Assembly: Assemble your sandwich just before serving to prevent sogginess from the dressing or lettuce.
Proper Breading: Make sure to press the breadcrumbs onto the chicken firmly during breading for a thicker, crunchier coating.
Fresh Ingredients: Use freshly grated Parmesan cheese for the richest flavor; it really makes your crispy Chicken Caesar Sandwich stand out!
Storage Tips for Crispy Chicken Caesar Sandwich
Fridge: Store leftovers in an airtight container and enjoy them within 1-2 days for optimal freshness and flavor.
Freezer: If you have leftover chicken cutlets, freeze them separately for up to 3 months. Reheat in the oven for crispiness.
Reheating: To maintain the crunch of the chicken, reheat in an oven at 375°F (190°C) for about 10-15 minutes. Avoid microwaving, as this can make it soggy.
Assembly Tip: It’s best to only assemble the Crispy Chicken Caesar Sandwich just before serving to keep the bread crispy and lettuce fresh.
Variations & Substitutions for Crispy Chicken Caesar Sandwich
Feel free to get creative and make this Crispy Chicken Caesar Sandwich your own; customization can elevate your meal in delightful ways!
-
Dairy-Free: Use a combination of tahini and coconut yogurt in the dressing for a creamy, dairy-free alternative.
-
Protein Swap: Replace chicken with grilled tofu or tempeh for a vegetarian twist. It’s just as satisfying and flavorful!
-
Avocado Upgrade: Add sliced avocado to your sandwich for a rich, buttery texture and a boost of healthy fats.
-
Bread Variety: Try whole grain or gluten-free baguettes for added nutrition and a different flavor profile that still holds up well against the fillings.
-
Heat It Up: Incorporate sliced jalapeños or a drizzle of sriracha in the dressing for a delightful kick that can spice up your sandwich experience.
-
Extra Crunch: Toss in some crispy bacon bits for an indulgent addition that pairs beautifully with the creamy dressing.
-
Herbed Chicken: Marinate your chicken cutlets in buttermilk and fresh herbs before breading for an aromatic twist that enhances the flavor.
-
Zesty Lemon: Add a bit of zest to your dressing with some grated lemon peel to brighten up all those rich elements.
Once you start experimenting with these variations, you’ll find your perfect version of the Crispy Chicken Caesar Sandwich! And if you’re looking for more ideas, consider pairing this delightful sandwich with a side of Cheesy Garlic Chicken Wraps or a serving of French Onion Chicken Rice Bake for a complete meal!

Crispy Chicken Caesar Sandwich Recipe FAQs
How do I select the best chicken cutlets?
Absolutely! When choosing chicken cutlets, look for ones that are pale pink with no dark spots or an off smell. Thighs are juicier, while breasts may be leaner; choose based on your preference. If possible, opt for organic or free-range chicken for better flavor and texture.
How can I store the Crispy Chicken Caesar Sandwich?
After enjoying your meal, leftovers can be stored in an airtight container in the fridge for up to 1-2 days. To keep your chicken crispy, do not assemble the sandwich until you’re ready to eat. You can store the components separately, reassembling just before serving.
Can I freeze any part of the sandwich?
Absolutely! You can freeze the cooked chicken cutlets separately for up to 3 months. To do this, let the chicken cool completely, then place it in a single layer on a baking sheet to freeze for about an hour. Once frozen, transfer them to a freezer bag, making sure to remove as much air as possible. When ready to eat, simply reheat in the oven to achieve that crispy texture again.
What if my chicken isn’t crispy after frying?
Very! If your chicken cutlets aren’t crispy, there could be a few reasons. Make sure your oil is hot enough (around 350°F/175°C) before frying, and ensure each cutlet is thoroughly coated with breadcrumbs without excess moisture. If they’re soggy, a wire rack can help drain excess oil, maintaining that crunchy texture.
Are there any dietary considerations for this sandwich?
Definitely! If you’re catering to dietary needs, you can easily make alterations. For a healthier version, consider using gluten-free breadcrumbs or substituting Greek yogurt with vegan mayo. If serving to pets, avoid dressing as garlic and onions can be harmful to dogs. Always check for allergies to the ingredients like dairy or eggs before serving!

Crispy Chicken Caesar Sandwich: A Crunchy Twist on Classic Flavors
Ingredients
Equipment
Method
- In a medium bowl, whisk together the full-fat mayonnaise, Greek yogurt, Dijon mustard, Worcestershire sauce, lemon juice, and Parmesan cheese until smooth and creamy. Add minced garlic, black pepper, and sea salt to taste. Cover and refrigerate for at least 30 minutes.
- Pound the chicken cutlets to an even thickness of about 1/2 inch. Season both sides with salt and black pepper.
- Create a breading station with three shallow plates for flour mixture, beaten eggs, and breadcrumbs mixed with dried herbs.
- Dredge each chicken cutlet in flour, then dip in eggs, and finally coat with the breadcrumb mixture.
- Heat oil in a skillet over medium-high heat. Fry the breaded chicken cutlets for about 4-5 minutes on each side until golden brown and crispy. Drain on a wire rack.
- Slice the French baguette, spread Caesar dressing on both sides, add a chicken cutlet, top with romaine hearts, sprinkle more Parmesan, and close the sandwich.
Leave a Reply