
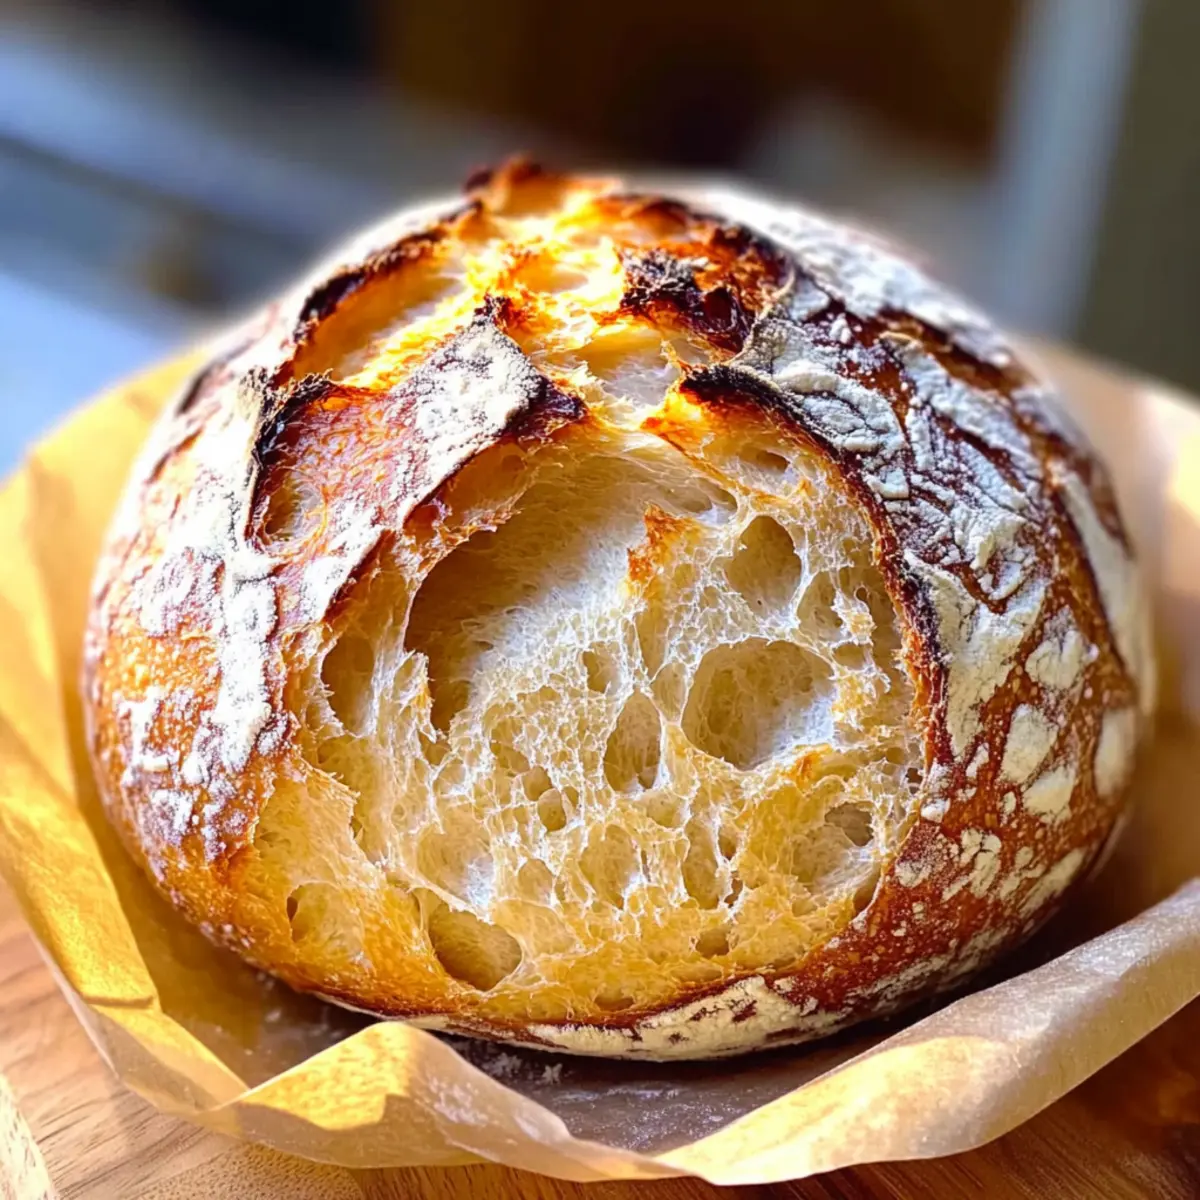
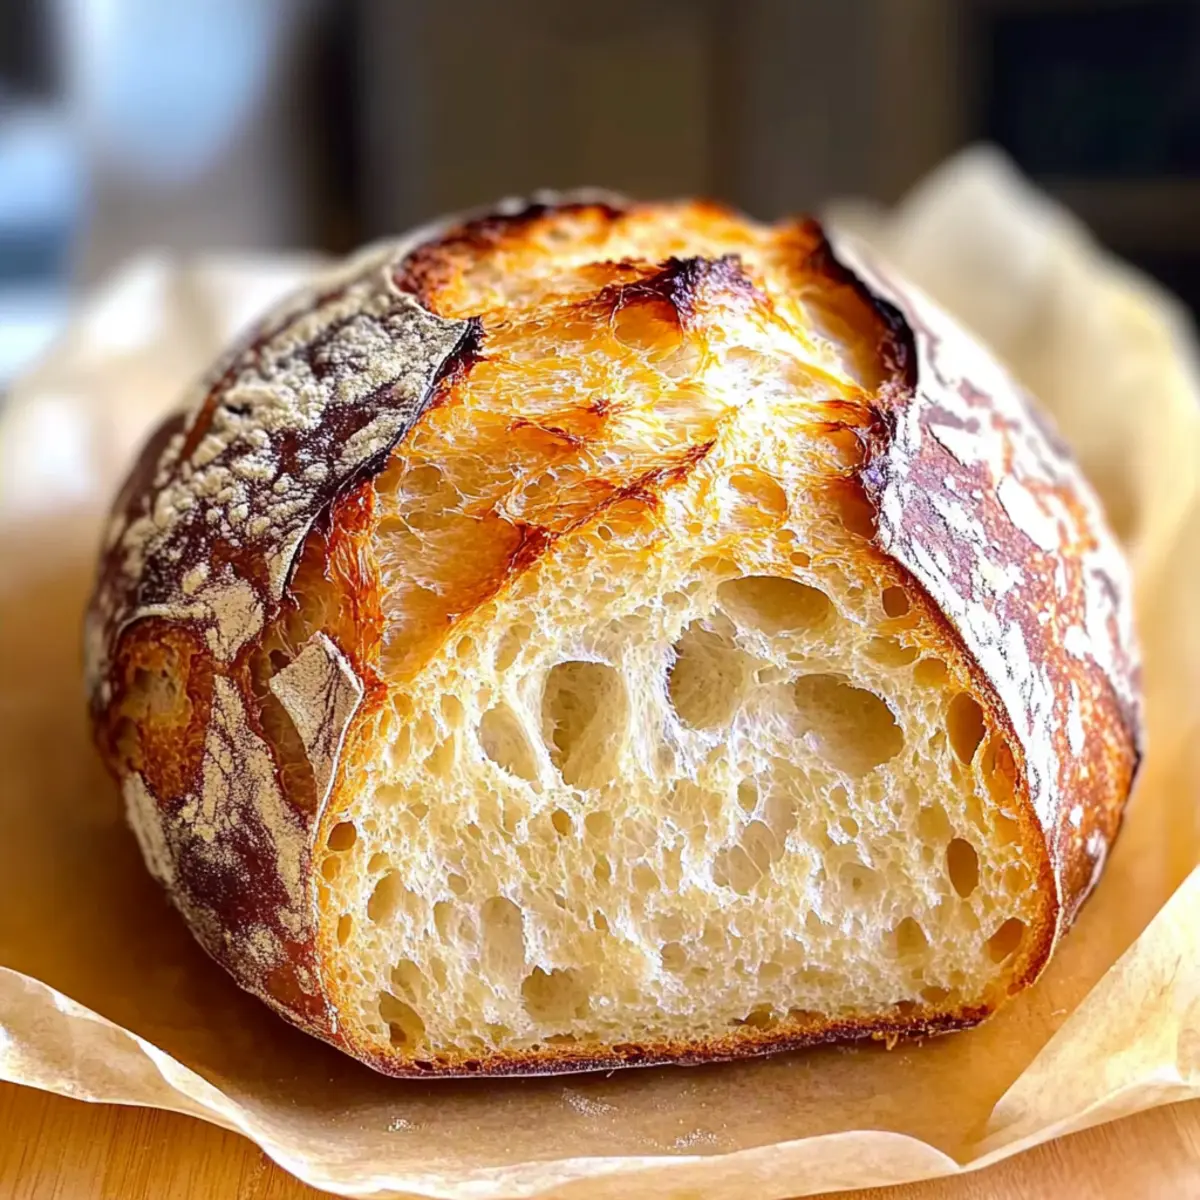
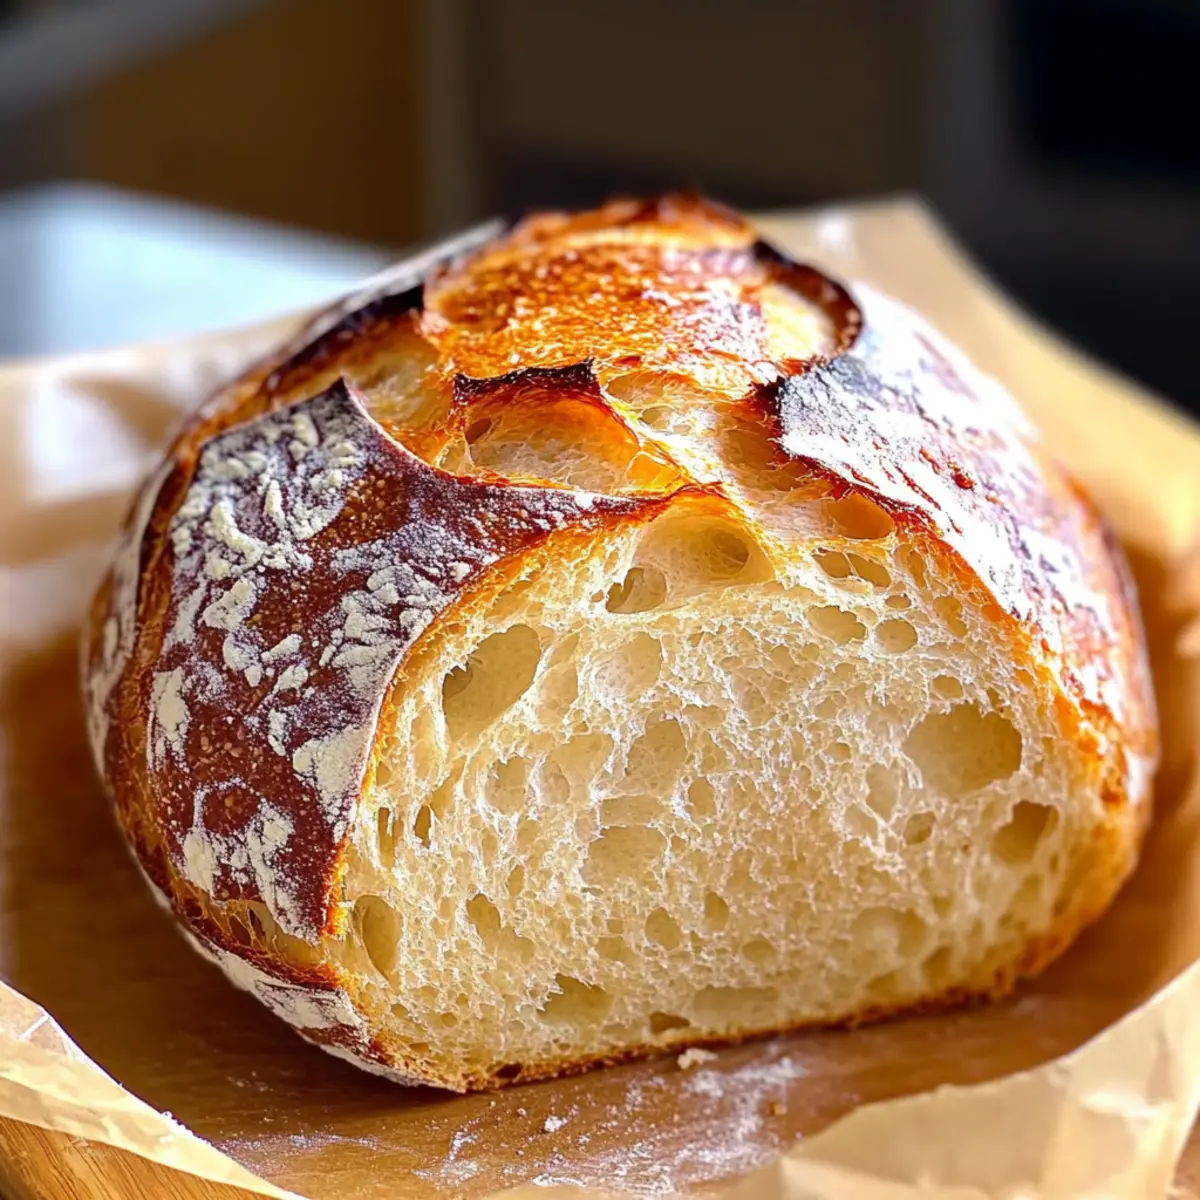
The scent of freshly baked bread wafts through my kitchen, instantly reminding me of cozy family dinners and heartfelt gatherings. If you’ve ever dreamed of crafting your own artisanal loaf without the hassle of kneading, you’re in for a treat with my Dutch Oven No Knead Crusty Bread. This recipe is not just straightforward—taking only five minutes of your time to prep—but it also delivers a beautifully crisp crust and tender, fluffy interior that everyone will love. Perfect for elevating your meals or simply enjoying a slice with butter, this easy bread can be a comforting addition to your weekly routine and will impress both family and friends alike. What flavors will you add to make it your own? Let’s dive into this delightful baking adventure together!
Why is This Bread So Special?
Simplicity at its finest: Just five minutes of prep is all it takes to create this stunning loaf!
Artisanal charm: Achieve that bakery-fresh quality right in your kitchen.
Versatile goodness: Customize your bread with herbs or cheese for a personal twist—like using cheddar for a richer flavor!
Perfect pairing: Whether with soup or slathered in butter, each slice complements your meal wonderfully.
Impressive results: Bring smiles to your dinner table, just like my Cuban Garlic Bread does!
Get ready to fall in love with baking!
Dutch Oven No Knead Crusty Bread Ingredients
For the Bread
- Warm Water – Essential for hydrating the dough; opt for filtered water to enhance flavor.
- Yeast – The secret to fluffy bread; make sure it’s fresh for optimal rise.
- Fine Grain Salt – Not only amplifies flavor but also strengthens the gluten network; kosher salt works well as a substitute.
- All-Purpose Flour – The backbone of your bread; consider mixing in whole wheat flour for added health benefits.
Baking this Dutch Oven No Knead Crusty Bread provides an easy way to bring the bakery into your home!
Step‑by‑Step Instructions for Dutch Oven No Knead Crusty Bread
Step 1: Mix the Dough
In a large mixing bowl, combine 1 ½ cups of warm water (about 110°F), 1 packet of fresh yeast (2.25 tsp), and 1 ½ tsp of fine grain salt. Use a whisk to stir until everything is dissolved. The mixture should feel warm and slightly frothy, indicating the yeast is activated.
Step 2: Incorporate the Flour
Add 3 ¼ cups of all-purpose flour to the yeast mixture all at once. Using a wooden spoon or your hands, mix until a sticky dough forms, ensuring no dry flour remains. The dough will be shaggy and somewhat wet, which is perfect for the Dutch Oven No Knead Crusty Bread.
Step 3: First Rise
Cover the bowl tightly with plastic wrap or a clean kitchen towel. Set it in a warm, draft-free area for about 2-3 hours, or until the dough has doubled in size and is dotted with bubbles. This slow rise is crucial for developing the flavor and structure of your crusty bread.
Step 4: Preheat the Oven
About 30-60 minutes before baking, place your Dutch oven (with the lid on) in the oven and preheat it to 450°F (232°C). This step is essential to create a hot environment for the bread, which will help achieve that irresistible crispy crust we all love.
Step 5: Shape the Dough
Once the dough has risen, lightly flour your work surface and gently transfer the dough onto it, avoiding deflating it too much. Shape the dough into a round loaf using your hands—be careful not to over-knead. The surface should feel somewhat smooth with a rustic look.
Step 6: Transfer and Bake
Carefully place the shaped dough onto a piece of floured parchment paper. Using the parchment as a sling, lift and drop the dough into the preheated Dutch oven. Cover it with the lid and bake for 35-40 minutes, letting the bread steam and rise to perfection.
Step 7: Finish Baking for a Crunchy Crust
After 35-40 minutes, remove the lid and continue to bake the bread for an additional 5-10 minutes, or until the crust is deep golden brown. This extra time helps to enhance the bakery-style crust that makes your Dutch Oven No Knead Crusty Bread truly artisanal.
Step 8: Cool Before Slicing
Once baked, carefully remove the Dutch oven from the oven and transfer the bread onto a wire rack. Allow the bread to cool for at least 10 minutes before slicing. This will help the texture set, giving you perfect slices that are ideal for sandwiches or enjoying with butter.
Expert Tips for Dutch Oven No Knead Crusty Bread
-
Watch the Rise: Keep an eye on the dough; it should double in size and have bubbles, indicating it’s ready to bake.
-
Add Flavor: Fold in fresh herbs, cheese, or olives to customize your Dutch Oven No Knead Crusty Bread – just be cautious not to add too much, which can affect the texture.
-
Preheat Properly: Make sure your Dutch oven is fully preheated. This step is crucial for achieving that sought-after crusty exterior.
-
Steam for Crunch: For an extra crispy crust, add a few ice cubes to the bottom of the Dutch oven just before closing it. The steam will enhance the baking process.
-
Cool Completely: Allow the bread to cool for at least 10 minutes after baking. This prevents sogginess and helps maintain the ideal texture for slicing.
Make Ahead Options
These Dutch Oven No Knead Crusty Bread loaves are perfect for meal prep enthusiasts looking to simplify their baking routine! You can prepare the dough up to 24 hours in advance; just mix the ingredients and let it rise as instructed, then cover it tightly with plastic wrap and refrigerate. This slow fermentation enhances the flavor, making your bread just as delicious! When you’re ready to bake, simply remove the dough from the fridge and let it sit at room temperature for about 30 minutes before shaping and baking as directed. Enjoy the luxury of having freshly baked bread with minimal effort during busy weeknights!
How to Store and Freeze Dutch Oven No Knead Crusty Bread
Airtight Container: Store leftover bread in an airtight container at room temperature for up to 5 days to maintain freshness and prevent staleness.
Freezer-Friendly: Wrap the bread tightly in plastic wrap and place it in a resealable freezer bag to freeze for up to 3 months. This keeps it flavorful and prevents freezer burn.
Reheating: To enjoy your frozen Dutch Oven No Knead Crusty Bread, thaw it overnight in the fridge, then warm slices in a preheated oven at 350°F (175°C) for 10-15 minutes until crispy and delicious.
Slicing: For best results, slice the bread before freezing, allowing for quicker reheating and easing the decision of how much to thaw!
What to Serve with Dutch Oven No Knead Crusty Bread
Prepare to elevate your dining experience with these delightful pairings that beautifully complement your freshly baked bread.
-
Creamy Tomato Soup: The rich, velvety texture of tomato soup creates a warming match for the bread’s crusty exterior.
-
Garlic Herb Butter: A spreadable delight, this buttery concoction adds aromatic flavor, melting into each slice and enhancing the bread’s natural goodness.
-
Fresh Salad: A crisp green salad drizzled with lemon vinaigrette brings a refreshing contrast to the warm, hearty loaf.
-
Cheese Platter: Serve with an assortment of cheeses for a simple yet sophisticated spread; think sharp cheddar, creamy brie, or tangy goat cheese.
-
Roasted Vegetables: Sweet caramelized vegetables paired with the bread create a comforting balance of flavors, perfect for a wholesome meal.
-
Herbed Olive Oil Dip: Elevate the experience with a fragrant oil infused with herbs and spices, inviting your guests to indulge in each bite.
-
Fruit Preserve: Sweet and tangy fruit preserves bring a playful twist, ensuring that every slice offers an extraordinary flavor journey.
-
Sparkling Wine: Pair with a bubbly sparkling wine to enhance your meal; the effervescence helps cleanse the palate between bites.
Make your Dutch Oven No Knead Crusty Bread the star of the table, surrounded by these delightful tastes and textures!
Dutch Oven No Knead Crusty Bread Variations
Feel free to get creative with your loaf and make it uniquely yours!
-
Herb-Infused: Add 1-2 tablespoons of dried rosemary or thyme to the dough for a delightful, fragrant twist that brightens up every slice. Imagine enjoying warm bread bursting with herby goodness!
-
Cheesy Delight: Fold in 1 cup of shredded cheese, like cheddar or parmesan, for a rich, savory flavor. The melted cheese will create delightful pockets of flavor, taking your bread up a notch.
-
Whole Wheat Twist: Substitute half of the all-purpose flour with whole wheat flour for a nuttier flavor and added fiber. This simple swap transforms your bread into a heartier option without sacrificing that crusty texture.
-
Olive-Studded: Mix in 1 cup of chopped olives, like Kalamata or green olives, to introduce a tangy, briny kick to your bread. The olives not only add flavor but also a fun, colorful visual!
-
Sweet Surprise: For a sweeter loaf, incorporate ½ cup of honey or ¾ cup of dried fruit like cranberries or apricots. This variation is perfect for a lovely breakfast or dessert option.
-
Spice it Up: Add a teaspoon of crushed red pepper flakes to introduce a subtle heat, making your Dutch Oven No Knead Crusty Bread perfect for pairing with soups or hearty stews.
-
Seed Topping: Before baking, sprinkle the top of the loaf with a mix of sesame or sunflower seeds for a nutty flavor and a delightful crunch in every bite. These seeds will toast beautifully in the oven!
-
Garlic Goodness: Mix in 2-3 minced garlic cloves or a tablespoon of garlic powder into the dough. This robust flavor can elevate a simple sandwich into something spectacular, reminiscent of my Cuban Garlic Bread.
These variations allow you to customize your bread experience, making it a fun and delicious adventure every time you bake!

Dutch Oven No Knead Crusty Bread Recipe FAQs
How do I know if my yeast is fresh?
To check if your yeast is fresh, combine it with warm water (around 110°F) and a pinch of sugar. After about 5-10 minutes, it should become frothy and bubbly. If it doesn’t, it’s best to toss it and get a new packet for your Dutch Oven No Knead Crusty Bread.
What’s the best way to store leftover bread?
Store leftover Dutch Oven No Knead Crusty Bread in an airtight container at room temperature for up to 5 days. If you notice it beginning to harden, consider wrapping it tightly in plastic wrap or aluminum foil to maintain its softness.
Can I freeze this bread, and how?
Absolutely! To freeze, wrap the cooled bread tightly in plastic wrap, ensuring all air is out, and then place it in a resealable freezer bag. It can be frozen for up to 3 months. When you’re ready to enjoy, let it thaw overnight in the fridge, then warm in the oven to restore its freshness!
What should I do if my dough doesn’t rise?
If your dough fails to rise, it might be due to inactive yeast or a cooler environment. Make sure your yeast is fresh and try placing the bowl in a warm area, like near a stove or in an oven preheated to its lowest setting (then turned off). The dough should rise within 2-3 hours.
Can I make this recipe gluten-free?
Yes, you can use a gluten-free all-purpose flour blend designed for baking. Just be sure to follow the specific instructions on the flour packaging regarding hydration and rising, as gluten-free doughs often require a different approach than traditional wheat flours.
Is it safe for pets or certain allergies?
This bread recipe is generally safe for humans; however, be cautious if your family members have allergies to gluten or yeast. Additionally, while the ingredients are safe for pets, it’s always best to give them bread in moderation and consult a vet if unsure about their diet!
Dutch Oven No Knead Crusty Bread Made Easy at Home
Ingredients
Equipment
Method
- In a large mixing bowl, combine warm water, fresh yeast, and fine grain salt. Whisk until dissolved.
- Add all-purpose flour to the yeast mixture. Mix until a sticky dough forms.
- Cover the bowl with plastic wrap or a kitchen towel and let it rise for 2-3 hours.
- Preheat the Dutch oven in the oven at 450°F (232°C) about 30-60 minutes before baking.
- Lightly flour work surface, transfer and shape the dough into a round loaf.
- Place the shaped dough onto floured parchment paper and lift it into the preheated Dutch oven.
- Cover and bake for 35-40 minutes.
- Remove the lid and bake for an additional 5-10 minutes until the crust is golden brown.
- Allow the bread to cool on a wire rack for at least 10 minutes before slicing.
Leave a Reply