
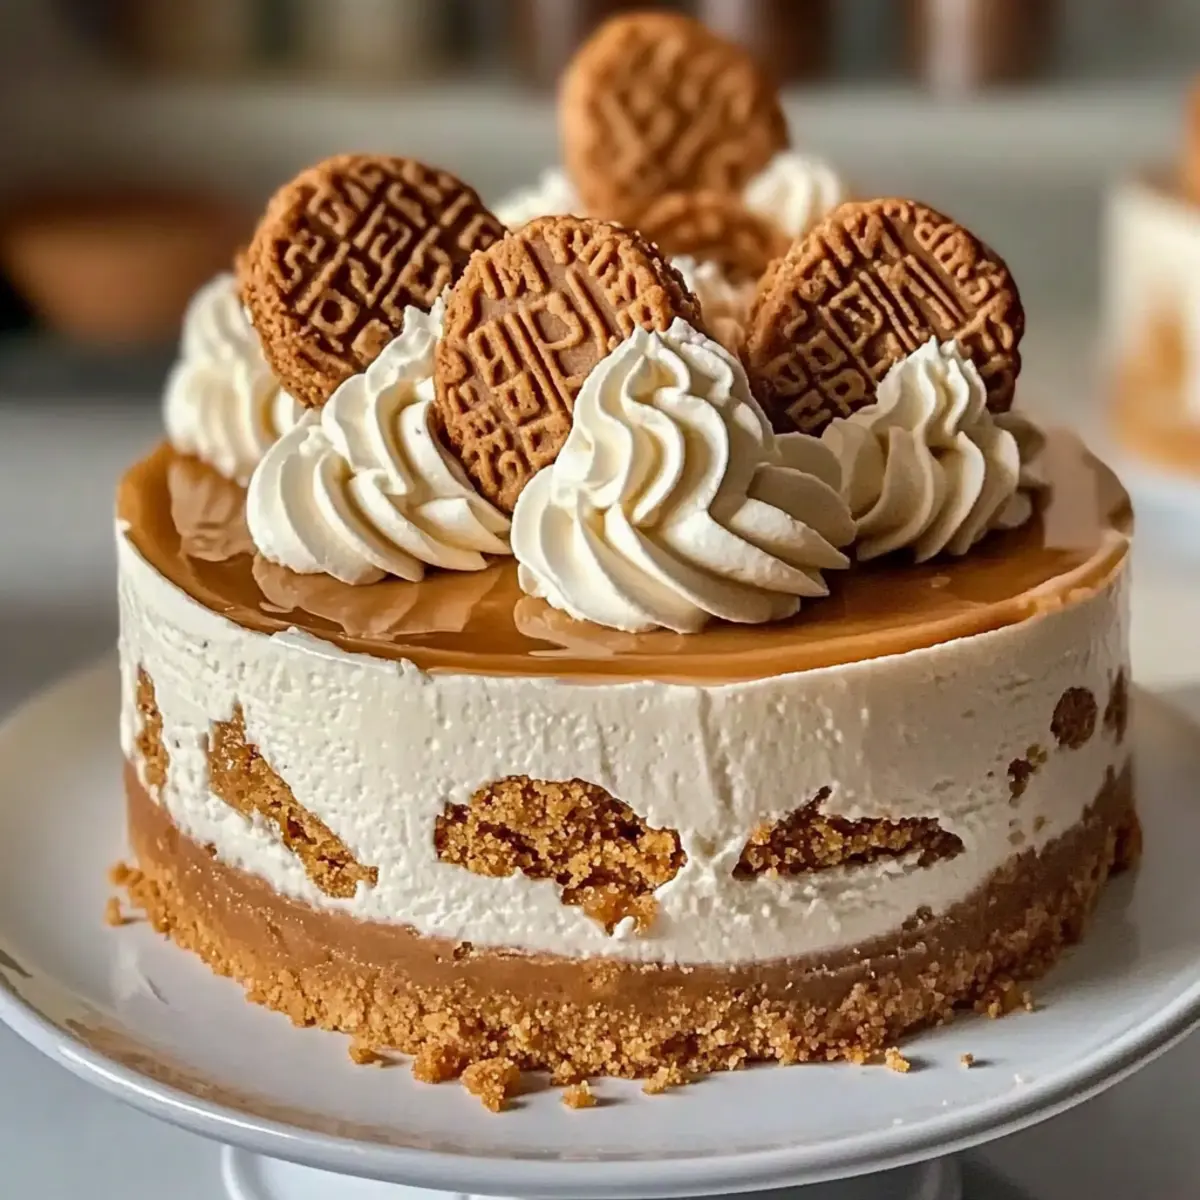
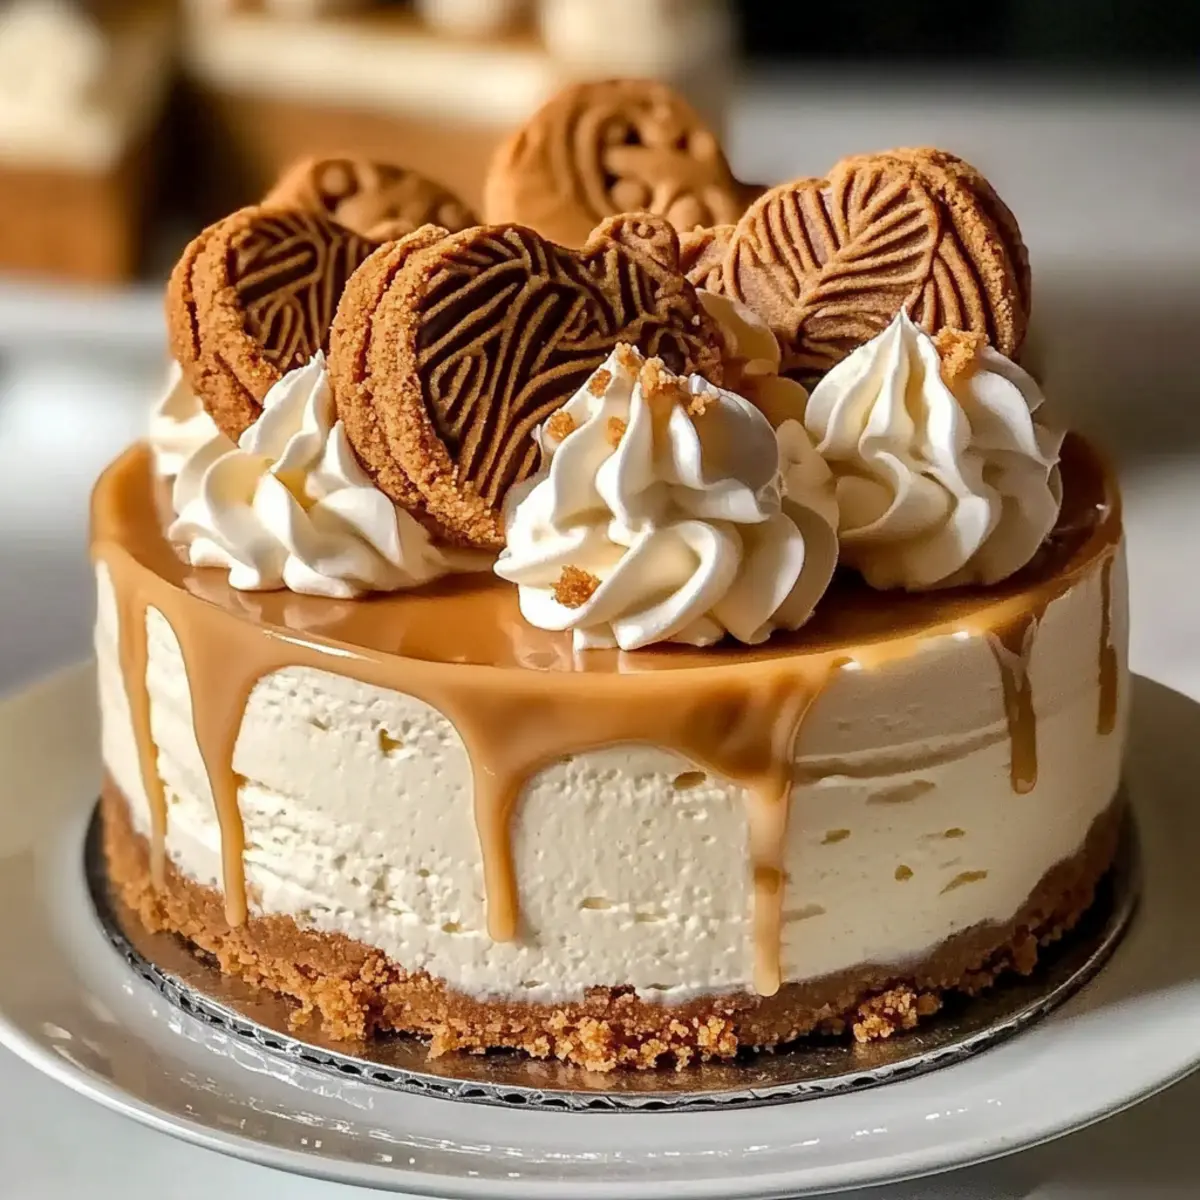
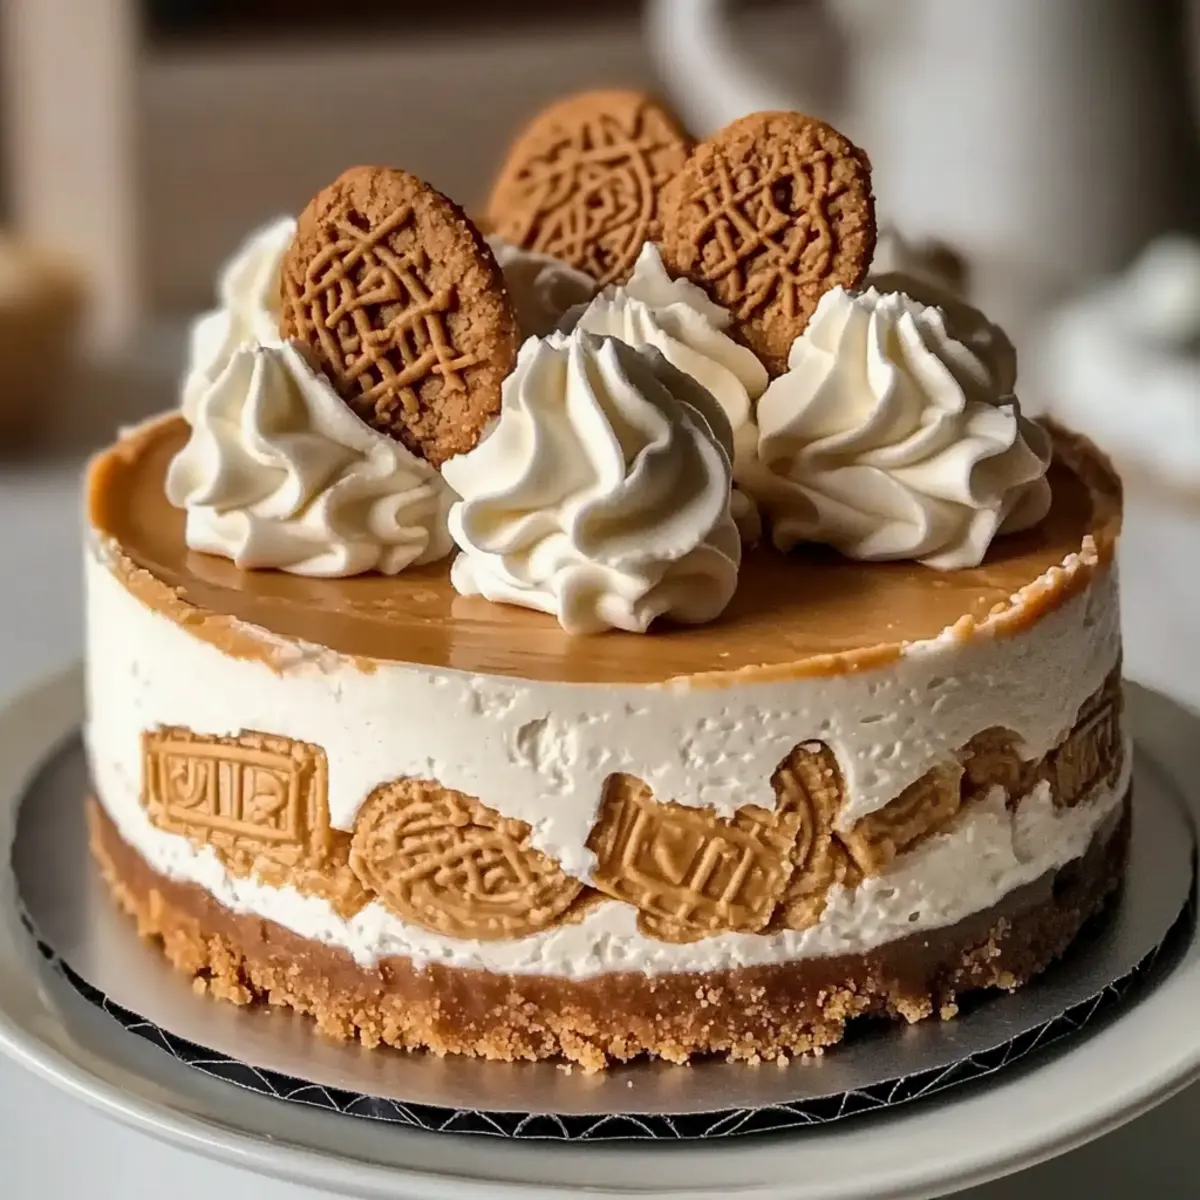
“Have you ever taken a bite of a dessert that instantly transported you to a cozy café, enveloped in the scent of spiced cookies?” That’s the magic of this Biscoff Cookie Butter Cheesecake! With its rich, creamy filling and a crust crafted from crushed Biscoff cookies, it delivers both indulgence and comfort. What sets this cheesecake apart is its impressive crack-free surface, a true triumph for any home baker. This dessert not only shines at special occasions but is also perfect for those evenings when you crave a sweet escape without hours of kitchen toil. Plus, it pairs beautifully with your favorite cup of coffee or a dessert wine. Ready to impress your guests (and yourself) with this showstopper? Let’s dive into the delightful details!
Why is this cheesecake a must-try?
Indulgence Reimagined: The creamy richness of this Biscoff Cookie Butter Cheesecake will make your taste buds dance with joy.
Unique Flavor Profile: Combining the spiced notes of Biscoff with smooth cream cheese results in a delectable treat you won’t forget.
Crowd-Pleasing Delight: Perfect for parties or simply a sweet night in, this cheesecake will impress friends and family alike.
Impressive Yet Easy: The straightforward baking process means you can shine as a home chef without the usual fuss.
Perfect Pairing: Serve it alongside coffee or dessert wine for the ultimate indulgent experience—just imagine it alongside Garlic Butter Chicken or Spinach Pesto Butter for a cozy dinner!
Versatile Variations: Feeling adventurous? Swirl in some chocolate or go lighter with your favorite yogurt for different interpretations.
Biscoff Cookie Butter Cheesecake Ingredients
• To create this delectable Biscoff Cookie Butter Cheesecake, gather some simple yet essential ingredients for a rich, creamy delight.
For the Crust
- Biscoff Cookie Crumbs – Finely crush about 20 cookies for a perfect base, approximately 2 cups in total.
- Biscoff Cookie Butter – This adds moisture and the iconic spiced flavor; ensure it’s at room temperature for smooth mixing.
- Butter (Melted) – Binds the crust ingredients well; feel free to substitute with margarine, but expect a change in flavor.
- Brown Sugar – Adds sweetness with a hint of caramel; you can use either light or dark.
- Salt (Pinch) – Enhances the crust’s flavor; while optional, it’s highly recommended.
For the Filling
- Cream Cheese – The creamy foundation for your filling; always opt for full-fat and softened for the best results.
- Granulated Sugar – Sweetens up the filling beautifully; consider substituting some with brown sugar for a richer taste.
- Eggs – Provide structure and richness; use large eggs at room temperature to avoid curdling.
- Sour Cream – This ingredient adds a nice tanginess; can be substituted with plain Greek yogurt if desired.
- Heavy Cream – Essential for a light texture; you can replace it with whipping cream if necessary.
- Vanilla Extract – Enhances the overall flavor; using pure extract is the way to go for optimal taste.
For the Topping
- Whipping Cream – Whip this up for beautiful rosettes; make sure it’s cold for the best whipping results.
- Powdered Sugar – This sweetens and stabilizes your whipped cream; it’s optional but adds a nice finish.
- Whole Biscoff Cookies – Perfect for garnishing; you can omit them if you prefer a simpler look.
Now that you have all your ingredients ready, get set to create your own Biscoff Cookie Butter Cheesecake that’s both impressive and irresistible!
Step‑by‑Step Instructions for Biscoff Cookie Butter Cheesecake
Step 1: Prep Crust
Preheat your oven to 350°F (175°C). In a mixing bowl, combine finely crushed Biscoff cookie crumbs, Biscoff cookie butter, melted butter, brown sugar, and a pinch of salt. Stir until the mixture resembles wet sand. Firmly press this crumb mixture into the bottom of a greased 9-inch springform pan and bake for 10 minutes. Once baked, remove from the oven and allow it to cool completely.
Step 2: Prep Filling
While the crust cools, set aside the cream cheese, eggs, sour cream, and Biscoff cookie butter to reach room temperature. In a large mixing bowl, beat the softened cream cheese until smooth, incorporating granulated sugar and Biscoff cookie butter gradually. Pay close attention to achieve a creamy consistency with no lumps, which will ensure the richness of your Biscoff Cookie Butter Cheesecake filling.
Step 3: Add Ingredients
Once the cream cheese mixture is smooth, add the eggs one at a time while mixing on low speed. This gradual addition helps to prevent cracks in your cheesecake. Next, blend in the sour cream, heavy cream, and vanilla extract until everything is well incorporated and velvety. This creamy filling is the heart of your delicious cheesecake, so ensure it’s thoroughly mixed without overbeating.
Step 4: Water Bath Setup
Prepare for baking by wrapping the bottom of your springform pan in aluminum foil to prevent water from seeping in. Place the wrapped pan in a larger roasting pan and add hot water to the roasting pan, filling it halfway up the sides of the springform. This water bath will help maintain moisture and create a gentle baking environment for your Biscoff Cookie Butter Cheesecake.
Step 5: Bake
Carefully pour the smooth filling into the cooled crust. Bake in your preheated oven at 325°F (165°C) for 60 to 70 minutes. The cheesecake is done when the edges are set, but the center still jiggles slightly—this gentle jiggle is a sign of its creamy, luscious interior. Avoid overbaking, as this can lead to cracks.
Step 6: Cooling
Once baked, turn off the oven and crack the door ajar to let the cheesecake rest for an hour. This gradual cooling process helps to prevent any cracks from forming. After an hour, transfer the cheesecake to room temperature and then refrigerate it for at least 4 hours, ideally overnight. This chilling step is important to set flavors and achieve that desired texture.
Step 7: Prepare Topping
When you’re ready to serve your Biscoff Cookie Butter Cheesecake, whip cold heavy cream in a mixing bowl until it begins to thicken. Gradually add powdered sugar and vanilla extract, continuing to whip until stiff peaks form. This fluffy topping will add a beautiful finish—pipe decorative rosettes on top of your cheesecake and sprinkle with cookie crumbs for a delightful touch.
Step 8: Garnish and Serve
For the final touch, decorate your cheesecake with whole Biscoff cookies arranged on top or around the edges. This not only enhances presentation but also adds a lovely crunch when served. Slice your cheesecake carefully, and enjoy the rich flavors and creamy texture that make the Biscoff Cookie Butter Cheesecake a true dessert delight!

Expert Tips for Biscoff Cookie Butter Cheesecake
-
Room Temperature Ingredients: Ensure all dairy ingredients are at room temperature for a lump-free batter and a creamy texture in your Biscoff Cookie Butter Cheesecake.
-
Avoid Overmixing: Mix gently after adding the eggs. Overmixing can lead to cracks in your cheesecake, so be sure to keep it smooth but not overly beaten.
-
Water Bath Wisdom: Using a water bath not only prevents drying but also helps achieve that creamy consistency. It’s key for a flawless texture!
-
Cool Gradually: Let your cheesecake cool in the oven with the door ajar for the first hour. This gradual cooling prevents surface cracks, ensuring a perfect presentation.
-
Chill Overnight: For optimal flavor and texture, refrigerate the cheesecake overnight. It truly allows the flavors to meld together beautifully.
What to Serve with Biscoff Cookie Butter Cheesecake
Transform your dessert experience by pairing this cheesecake with delightful accompaniments that elevate every bite!
-
Espresso: The bold, rich flavor of espresso perfectly contrasts the creamy cheesecake, creating a delightful balance. This combination is a luxurious way to end any meal.
-
Fresh Berries: A medley of raspberries, blueberries, and strawberries adds a pop of freshness to the rich cheesecake. Their tartness brightens the flavor profile, making each forkful a lovely adventure.
-
Chocolate Sauce: Drizzling warm chocolate sauce over your cheesecake introduces an indulgent layer of flavor. It’s the perfect way to satisfy chocolate cravings while enjoying the spiced notes of Biscoff.
-
Whipped Cream: Adding a dollop of homemade whipped cream enhances the creaminess of the cheesecake without overwhelming it. This simple addition makes for a light and airy bite, perfect after a rich dessert.
-
Dessert Wine: A glass of sweet dessert wine or ice wine complements the cheesecake’s richness beautifully, adding complexity with each sip. It’s an elegant choice that turns a simple dessert into a special occasion.
-
Ginger Snap Cookies: For a crunchy contrast, serve alongside ginger snap cookies. Their warm spices harmonize well with Biscoff flavors, creating an exciting texture combo to your dessert experience.
-
Fruit Tart: Slice through the richness with a light, fruity tart. The vibrant flavors and textures create a refreshing counterpoint to the cheesecake’s indulgence, making it a delightful pair.
-
Coffee: A warm cup of coffee is always a classic choice that rounds out your dessert. The bitterness cuts through the sweetness and enhances the flavors of both the cheesecake and the coffee.
Storage Tips for Biscoff Cookie Butter Cheesecake
- Fridge: Store your cheesecake in an airtight container in the refrigerator for up to 7 days. For optimal quality, consume within the first 5 days to enjoy its creamy richness.
- Freezer: If you’d like to keep it longer, slice the cheesecake and wrap each piece tightly in plastic wrap, then place in a freezer-safe container. It can last up to 2 months in the freezer.
- Reheating: For a refreshing experience, allow frozen slices to thaw in the fridge overnight before serving. Enjoy your Biscoff Cookie Butter Cheesecake chilled for the best flavor!
- Avoid Room Temperature: Keep the cheesecake refrigerated and do not leave it at room temperature for more than 2 hours to maintain its delicious texture and flavor.
Make Ahead Options
This Biscoff Cookie Butter Cheesecake is perfect for busy home cooks looking to save time! You can prepare the crust and filling up to 24 hours in advance. Simply make the crust and filling, as directed, and after pouring the filling into the cooled crust, cover it with plastic wrap or foil and refrigerate. This chilling time not only enhances the flavors but also helps maintain that smooth, creamy texture. When you’re ready to serve, simply whip the heavy cream and pipe it on top along with your Biscoff cookie garnish for an elegant finish. Enjoy the convenience of meal prep while ensuring your cheesecake is just as delicious as if made fresh!
Biscoff Cookie Butter Cheesecake Variations
Explore delightful twists to make this indulgent cheesecake truly your own, sparking joy with every bite!
-
Spiced Cookies: Replace Biscoff cookies with another spiced cookie for the crust, like Speculoos or ginger cookies.
-
Chocolate Swirl: Add a generous swirl of melted chocolate or caramel into the filling for an irresistible chocolatey twist. Imagine that gooey richness blending beautifully with the spiced flavor!
-
Fruit Flavors: Incorporate ripe bananas or pureed berries into the filling for a fruity flair that balances the rich flavors perfectly.
-
Nutty Crunch: Add chopped nuts like pecans or almonds to the crust for an enjoyable textural contrast and nutty flavors that complement the spiced cheesecake.
-
Lower-Fat Option: Swap in lower-fat cream cheese and sour cream for a lighter version, while still keeping the cheesecake deliciously creamy.
-
Mini Cheesecakes: Consider making mini cheesecakes in a muffin tin for portion control and cute presentations—great for parties or gift-giving!
-
Dairy-Free Delight: Use coconut cream instead of heavy cream and a dairy-free cream cheese for a vegan-friendly alternative without losing that silky texture.
-
Salted Caramel Drizzle: Drizzle a bit of salted caramel over the top before serving for added sweetness and a decadent touch that enhances every bite.
Feel free to experiment and make this recipe uniquely yours! For an impressive meal, pair it with savory dishes like Juicy Steak Bites with Garlic Butter Parmesan or a refreshing side of Yogurt Peanut Butter!
Biscoff Cookie Butter Cheesecake Recipe FAQs
What should I look for when selecting Biscoff cookies?
Absolutely! When choosing Biscoff cookies, look for those without any cracks or dark spots all over, as this indicates freshness. Aim for cookies that are crispy and have a strong spiced aroma—these will enhance the flavor of your cheesecake.
How should I store leftover Biscoff Cookie Butter Cheesecake?
For best results, refrigerate your cheesecake in an airtight container for up to 7 days. I recommend enjoying it within the first 5 days for optimal flavor and texture. Just remember to keep it cold and avoid leaving it at room temperature for more than 2 hours.
Can I freeze my Biscoff Cookie Butter Cheesecake?
Yes, you can! To freeze, slice the cheesecake into individual pieces. Wrap each slice tightly in plastic wrap, ensuring to remove as much air as possible. Place the wrapped slices in a freezer-safe container, where they can stay fresh for up to 2 months. When you’re ready to enjoy, simply thaw in the refrigerator overnight before serving for the best taste.
What if my cheesecake cracks while baking?
Very! Cracks can sometimes happen, but there are ways to mitigate this. Ensure you’re using room temperature ingredients, and avoid overmixing once the eggs are added. Another tip: make sure you’re using a water bath, which helps regulate the baking temperature and keeps the cheesecake moist. If it does crack, don’t worry—just cover it with whipped cream and Biscoff cookie crumbs for a delicious disguise!
Is this cheesecake safe for people with nut allergies?
This Biscoff Cookie Butter Cheesecake is generally nut-free, but always read the labels on your ingredients to ensure there are no cross-contaminants or added nuts. Additionally, if you have concerns about allergies, feel free to substitute the Biscoff cookie butter with a nut-free alternative, or use cookies specifically marked as nut-free.
Silky Biscoff Cookie Butter Cheesecake You Need to Try
Ingredients
Equipment
Method
- Preheat your oven to 350°F (175°C). In a mixing bowl, combine finely crushed Biscoff cookie crumbs, Biscoff cookie butter, melted butter, brown sugar, and a pinch of salt. Stir until the mixture resembles wet sand. Firmly press this crumb mixture into the bottom of a greased 9-inch springform pan and bake for 10 minutes. Once baked, remove from the oven and allow it to cool completely.
- While the crust cools, set aside the cream cheese, eggs, sour cream, and Biscoff cookie butter to reach room temperature. In a large mixing bowl, beat the softened cream cheese until smooth, incorporating granulated sugar and Biscoff cookie butter gradually.
- Once the cream cheese mixture is smooth, add the eggs one at a time while mixing on low speed. Next, blend in the sour cream, heavy cream, and vanilla extract until everything is well incorporated.
- Prepare for baking by wrapping the bottom of your springform pan in aluminum foil to prevent water from seeping in. Place the wrapped pan in a larger roasting pan and add hot water to the roasting pan, filling it halfway up the sides of the springform.
- Carefully pour the smooth filling into the cooled crust. Bake in your preheated oven at 325°F (165°C) for 60 to 70 minutes.
- Once baked, turn off the oven and crack the door ajar to let the cheesecake rest for an hour. After an hour, transfer the cheesecake to room temperature and then refrigerate it for at least 4 hours, ideally overnight.
- When you're ready to serve, whip cold heavy cream until thick, gradually adding powdered sugar and vanilla extract until stiff peaks form.
- Decorate your cheesecake with whole Biscoff cookies arranged on top or around the edges for presentation. Slice carefully and enjoy!
Leave a Reply